The first step in this process is to enter the general definitions, rules and sequences.
The Compliance setup is accessed through SETUP | Property Group | Property Setup | Compliance. There are three tabs that determine what rule the homeowner is violating and what the consequences are.
Information tab
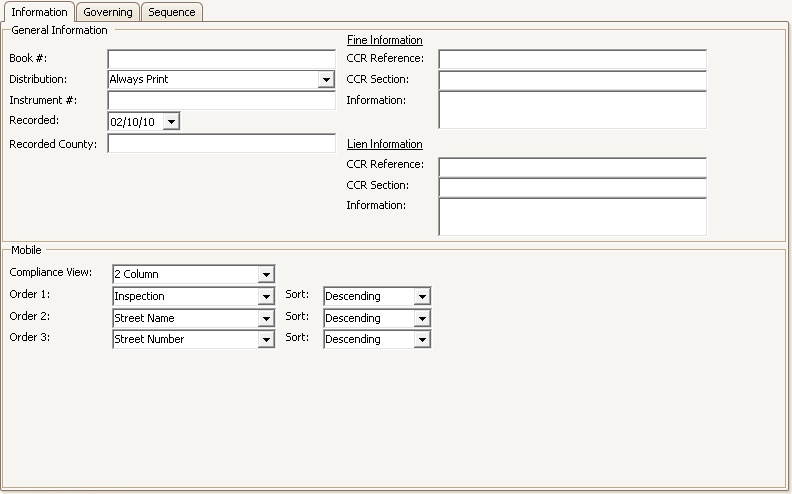
The Information tab allows the user to record information related to the recording of the governing documents and the specific guidelines to follow for applying fines and liens. The fields are defined as follows:
General Information
Field |
Description |
|---|---|
Book # |
The CC&R book number |
Distribution |
Determines how the compliance letters are to be rendered. The options available are:
Always Print: Compliance letters will always be printed when compliance is processed. Email and Print: Compliance letters will be printed and emailed when compliance is processed. Email/Otherwise Print: Compliance letter will be emailed if the contact record used to create the letter has a valid email address, otherwise, the letter will be printed.
|
Instrument # |
The CC&R instrument number. |
Recorded |
The date the CC&Rs were recorded. |
Recorded County |
The county the CC&Rs were recorded in. |
|
If the Distribution definition is set to email the letter, the email address field MUST BE defined for the letter templates. |
The following Fine and Lien information fields can be used for letter / reporting purposes. Ideally this information should only be used for the intended purpose, which allows a letter to know exactly where to locate required information to tell the recipient why a resident can be fined or liened based on community rules.
Fine Information
Field |
Description |
|---|---|
CCR Reference |
The CC&R fine reference |
CCR Section |
The CC&R fine section |
Information |
The CC&R rule information for fines |
Lien Information
Field |
Description |
|---|---|
CCR Reference |
The CC&R lien reference |
CCR Section |
The CC&R lien section |
Information |
The CC&R rule information for liens |
In the Information tab, the user can also define the layout and format of the mobile compliance portal. This will be discussed later in the Mobile Compliance section.

Governing tab
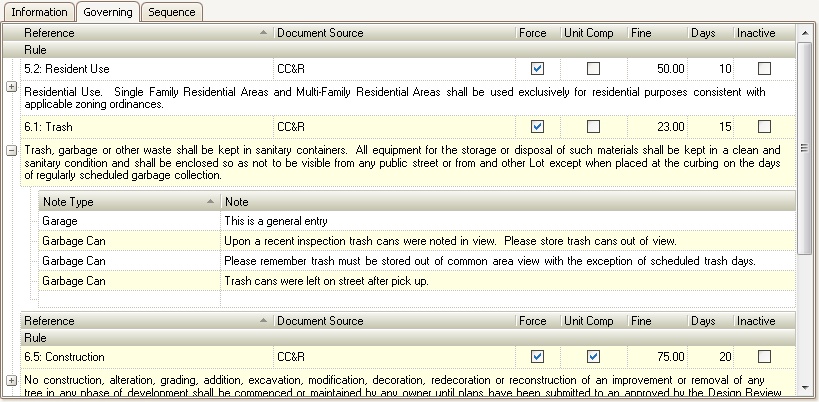
The Governing tab is used to define the rules and regulations of the property. The fields are defined as follows:
Field |
Description |
|---|---|
Reference |
The exact article number from the governing documents for the rule of the violation |
Document Source |
The exact governing document that the rule is printed from |
Rule |
The rule found in the article number of the governing document listed above |
Force |
When checked, the system will display a window with the Common List entered for the rule (see below). |
Unit Comp |
This field tells the system to assign a current compliance record to a new resident when being added to a unit.
The following processes occur when a New Owner is added to the unit: 1.Keep the current Unit Compliance issues opened, but change the compliance to the New Owner status, which can be used to create a friendly letter to the new resident. 2.Close any outstanding non-unit based issues (example, trash can issue), adding a record to the compliance stating it was closed because the new owner was added.
If the new resident does not comply based on the friendly letter, the system will move the compliance issue to the first defined sequence, basically starting the compliance over with the new owner.
Note: Any open Unit Compliance issues are reported through VMSXChange when title / escrow document vendors like Condo Certs, GetDocsNow and Homewise Documents request unit information for disclosure purposes. |
Fine |
The amount to charge the homeowner for not being compliant |
Days |
The number of days between each fine |
Inactive |
Allows the user to inactivate a specific rule that is no longer being used |
Common List
Expanding the plus button ![]() allows the user to create common list used to automatically add verbiage to any compliance letter without typing in the same information for similar violation issues. When the Force box is checked, the list of entered entries in this list is displayed to the user, allowing the user to select from one or more entries to populate the letters printed.
allows the user to create common list used to automatically add verbiage to any compliance letter without typing in the same information for similar violation issues. When the Force box is checked, the list of entered entries in this list is displayed to the user, allowing the user to select from one or more entries to populate the letters printed.

How to add a Rule with a Common List
1.Scroll to the bottom of the Rule list to the last blank row
2.Enter a Reference for the rule
3.Enter the Document Source
4.Select the Force checkbox if the user entering a compliance record with this rule must select from the Common List
5.Select the Unit Comp checkbox if the rule is unit based (like an architectural issue)
6.Enter a Fine amount used when a compliance issue moves to the Fine sequence
7.Enter the number of Days between each fine
8.Enter the Rule verbiage used to print on letters (the more information added, the longer the paragraph will be on the letter)
If you want the user to select from a Common List of items
1.Expand the grid using the ![]() button in front of the rule row
button in front of the rule row
2.Scroll to the bottom of the Common List to the last blank row
3.Select the Compliance Type by clicking in the cell and selecting an item using the dropdown button ![]()
4.Enter the note that will be selected by the user entering compliance issues with this rule
Compliance Sequences
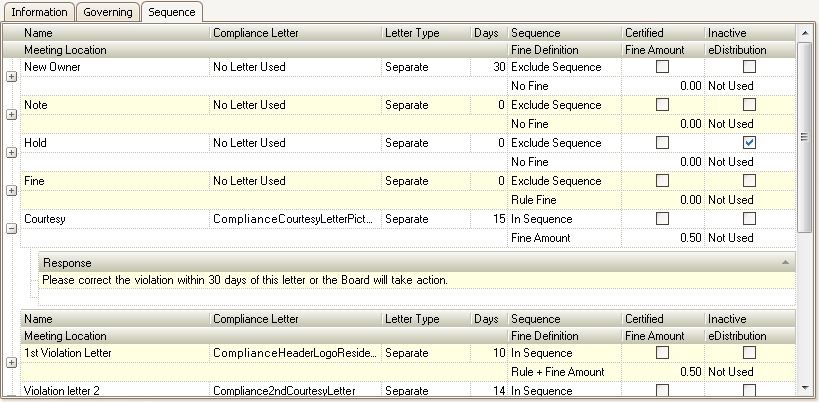
The Sequence tab gives the ability to create each action to be taken when in violation of a rule. Letters can be selected or created to attach to each action. The fields are defined as follows:
Field |
Description |
|---|---|
Name |
The name given to the sequence |
Compliance Letter |
The letter selected to be printed when the owner is in the sequence |
Letter Type |
Two options available here:
Separate: If the homeowner is in violation of more than one rule, each compliance issue will be printed on a separate letterGroup: If homeowner is in violation of more than one rule, all compliance issues will be included on one letter (this requires a special grouped letter template) |
Days |
The number of days between this sequence and the next one defined. |
Sequence |
Three options available here: In Sequence: include the sequence in the automation process; this means the system will automatically go to this sequence when the previous "In Sequence" has been processedExclude Sequence: exclude the sequence in the automation process; this means the system will skip this sequence and not move to the next one labeled as "In Sequence". If the user wants to process this sequence, they will have to manually move the owner to this particular sequence.Close: closes the compliance record |
Certified |
Flags the sequence so that a certified label can be created |
Inactive |
Inactivates the sequence |
Meeting Location |
A meeting location can be entered to print on the letter |
Fine Definition |
Allows the user to select which fine amount the owner needs to be charged. Four options available here:
No Fine: will not charge any fine at all. Fine Amount: will charge the owner the amount in the Fine Amount field in the Sequence tab.Rule Fine: will charge the owner the amount in the Fine field in the Governing tab.Rule + Fine Amount: will charge the owner both the Fine in the Governing tab AND the Fine Amount in the Sequence tab |
Fine Amount |
The amount to charge the homeowner for not being compliant |
eDistribution |
Two options available here:
Export/Print: the letters will be exported to a 3rd party vendor AND printed/emailed in-house.Export Only: the letters will only be exported to a 3rd party vendor for printing and distribution |
Response |
Found by clicking the plus sign next to the sequence. Allows the user to select from the predefined list used when maintaining the compliance record |

How to add a Compliance Sequence
1.Scroll to the bottom of the Sequence list to the last blank row
2.Enter a Name that identifies the letter sequence
3.Select a Compliance Letter template by clicking in the cell and selecting an item using the dropdown button ![]()
4.Select the Letter Type
5.Enter the number of Days between this and the next sequence
6.Select the automated Sequence selection
7.Select the Certified checkbox if printing certified cards or if you want to notify your printing vendor, if using eDistribution, to certify the letter
8.Enter the Meeting Location if a letter needs this data on the letter for meeting purposes
9.Select the Fine process
10.Enter the Fine amount
11.Select the eDistribution method
If you want the user to select from a list of Responses which can be used when rendering a letter
1.Expand the grid using the ![]() button in front of the sequence row
button in front of the sequence row
2.Scroll to the bottom of the Response List to the last blank row
3.Enter the Response
Setting Up the Fine Process
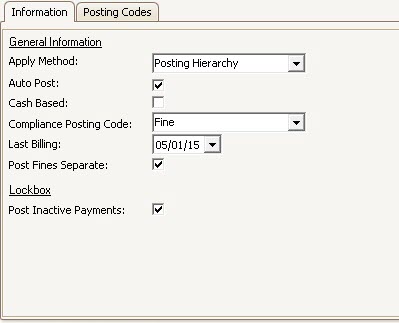
There are two AR settings that need to be considered before fining owners for compliance issues when processing fines through Compliance.
Through SETUP | Property Group | Property Setup | Accounting | AR | Information:
1. The Compliance Posting Code must be selected in order for the system to know which posting code to use when a compliance is moved to a fine.

2. If desired (generally based on state statute), the system can be setup to post compliance fines to a separate Compliance sub-account instead of the Owner's assessment account. Check the Post Fines Separate box to force the system to create the unique Compliance Account linked to the Owner account when a fine is posted. Doing this will maintain two account numbers, one for the Owner assessment account and the other for the Compliance account.
|
If a Compliance issue is set to Tenant, the system will automatically create a Tenant sub-account and post fines to it, instead of the Compliance sub-account. |