The Blast Email application is accessed through HOME | Common Group | Blast Email.
How to send a blast email:
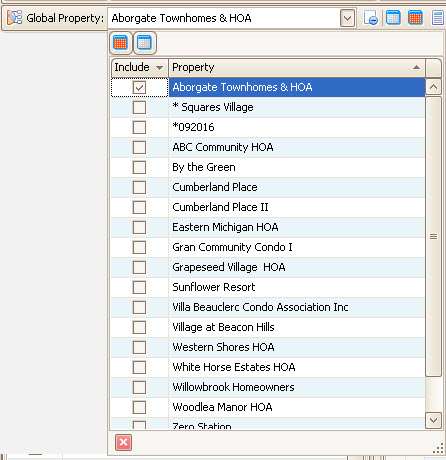
1. Select the desired properties to search using the Property Selection drop-down button and checking the desired properties or double-click a property to set it as the Global Property, which filters for the specific property. Press the drop-down button or close button ![]() located in the list windows at the bottom, left to close the selection box.
located in the list windows at the bottom, left to close the selection box.

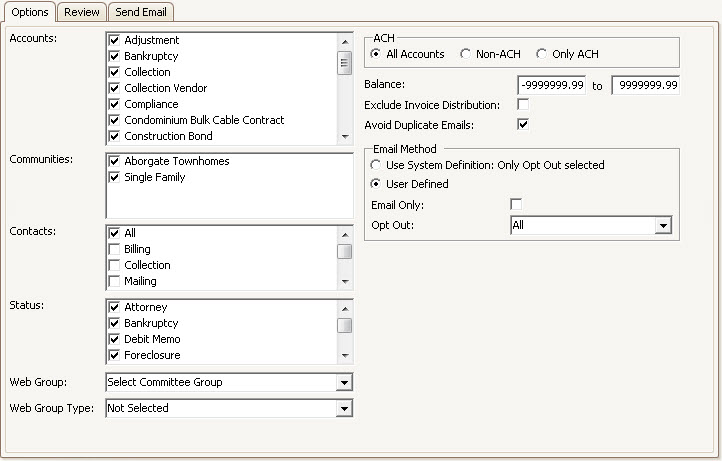
2. In the Options tab, the filters are used to located the email addresses of the accounts that an email needs to be sent to.
Field |
Description |
|---|---|
Accounts |
Select the account type(s) to send an email to. |
Communities |
Select the property to send an email to |
Contacts |
Select the contact types to send the email to |
Status |
Select the delinquency status of the accounts that an email needs to be sent to. |
Web Group |
Select the web group that an email needs to be sent to (only applicable if Global Property selected). |
Web Group Type |
Select the web group type if multiple properties are selected Architectural:Include only Architectural members Compliance:Include only Compliance members Governing:Include only Governing members |
ACH |
Include or exclude owners with an ACH record
All Accounts: Include all accounts Non-ACH: Include only accounts that do not have an ACH record on file Only ACH: Include only accounts that have an ACH record on file.
|
Balance |
Enter the between range of balances if you want owners with certain balances to receive the email. |
Exclude Invoice Distribution |
Select this box if you want to exclude any accounts that have the Skip Invoices box selected in the owner account's Billing Options tab. |
Avoid Duplicate Emails |
Select this box to avoid duplicate email addresses when an owner has the same email address on more than one account. |
Email Method |
Use System Definition: Select this to use the Opt In definition through Program Options. User Defined: User defined options Email Only: Includes Email Only accounts Opt Out: Select All Accounts, only Checked Accounts, or Unchecked accounts based on the Opt Out box status in the Web tab of the owner's account. |

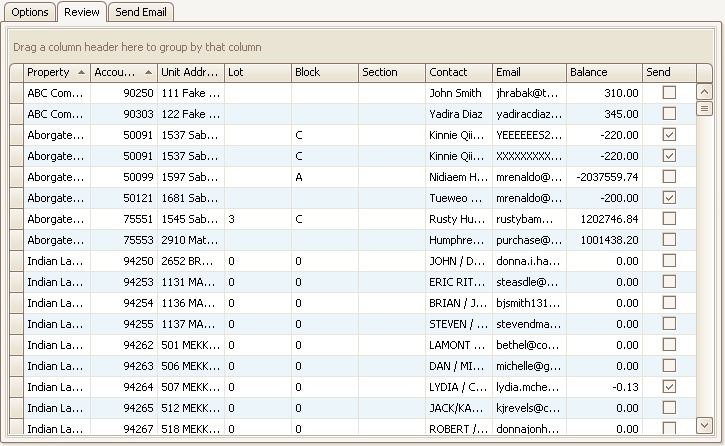
3. After all filters are established, go to the Review tab.
4. Click the Refresh button ![]() in the Quick Access Toolbar. The list will show any accounts that meets the criteria selected in the Options tab.
in the Quick Access Toolbar. The list will show any accounts that meets the criteria selected in the Options tab.
5. Check the Send box next to each owner an email needs to go to or click the Select All button ![]() in the Quick Access Toolbar.
in the Quick Access Toolbar.

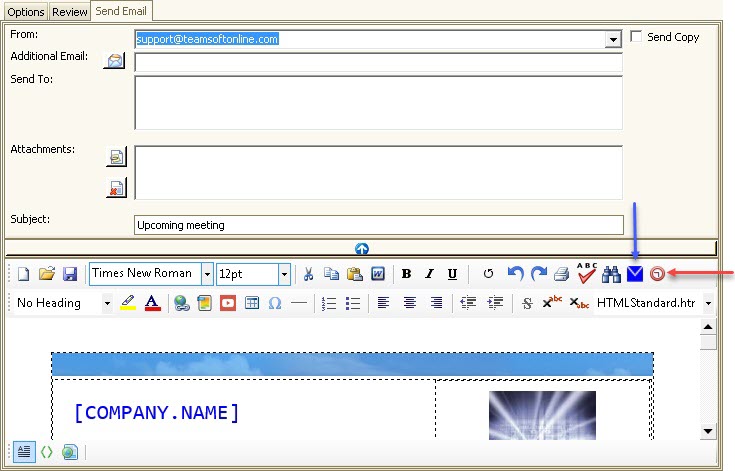
5. Once all email addresses are selected, go to the Send Email tab. An Email window will appear with the following fields:
Field |
Description |
|---|---|
From |
This field will default with the current user's email address as long as their email address is setup in SETUP | Configuration Group | Employee Management. If the property has an email address defined through SETUP | Property Setup, this address will be the default email address. |
Send Copy |
Allows the user to send a copy of the email to their email address |
Additional Email |
Other email addresses can be entered to include those individuals in receiving the email. |
Send To |
This list contains any additional emails added. |
Attachments |
Documents can be attached to send with the email. The user can drag and drop digital documents to the this box to include. |
Subject |
A subject for the email may be entered. |
6. In the lower half of the window a generic email template allows the user to enter the body of the email message.
|
Additional email templates can be customized by the user and added to the template selection drop-down menu. The system will use the HTML template selected to the property (if only one property is selected), otherwise the default replaces it. |
7. To send the email, the user has two options available:
▪The user can click the Send button (blue arrow), ![]() , once all information is entered and an email will be sent to each account. The system will immediately start processing those emails which could take some time to complete and not allowing the user to access other areas in VMS.
, once all information is entered and an email will be sent to each account. The system will immediately start processing those emails which could take some time to complete and not allowing the user to access other areas in VMS.
▪The user can click the Queue Email button (red arrow), ![]() , to schedule a specific date and time for the email to be sent out by the Queue. This features avoids having to wait for the emails to be sent on the workstation.
, to schedule a specific date and time for the email to be sent out by the Queue. This features avoids having to wait for the emails to be sent on the workstation.
|
Your environment must have the latest VMSQueue installed for this feature. |

8. An account note will be added to each account with the email attached to it for record keeping and retrieval.