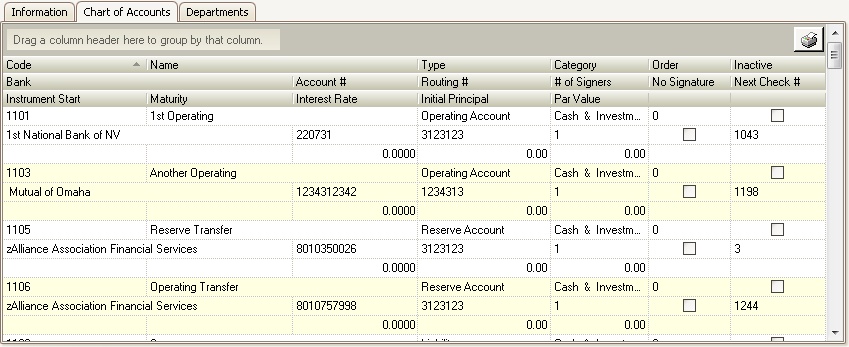
The Chart of Accounts area allows the user to setup bank information for each property and assets, capital, expenses and liabilities to be used when entering transactions into the system. It also defines bank accounts that are used in AP and AR.
The Chart of Accounts section is accessed through SETUP | Property Group | Property Setup | Accounting | GL | Chart of Accounts
The fields are defined as follows:
Field |
Description |
|---|---|
Code |
Enter code for the account. Hyphens (-) can be used. |
Name |
Enter the name of the account. |
Type |
Select the Type of predefined accounts. |
Category |
Select the Category, that can be customized in SETUP | Program Defaults | Codes | GL Category |
Order |
Enter the order in which the account should be printed on specific financial reports. It is recommended to use increments of 10's in the Order field. |
Inactive |
Place a check mark to no longer use this account. Note, the account should not be linked to a Posting Code or Memorized AP/Journal Entry in order to make it inactive. |
Bank |
Required field if you are setting up a bank account. Select the bank that hold the account. |
Account # |
Required field if you are setting up a bank account. |
Routing # |
Required field if you are setting up a bank account. |
# of Signers |
Enter the number of signers required on the check from that specific account when using the online approval system. |
No Signature |
Normally used with Reserve Accounts to prevent employees signatures from being be printed on checks. Property Setup | Accounting | AP | Information | Check Signatures will not be printed. If checked, a board member approves the invoice online and there is a valid signature for the board member, this signature will print on the check. |
Next Check # |
Required field if you are setting up a bank account. It should not be zero (0). It is recommended to start your check number with a unique and easy to identify number, for example: 200000. |
Instrument Start |
Optional. Enter the date the account started. |
Maturity |
Optional. Enter the date the account matures/expires. |
Interest Rate |
Optional. Enter the Interest Rate on the bank account. |
Initial Principal |
Optional. Enter the Initial Principal of the account. |
Par Value |
Optional. Enter the Par Value of the account. |
Forecast |
Optional. Enter the Forecast of the account. |
To add a new code to the Chart of Accounts:
1. Scroll down to the bottom of the list and find the next blank set of fields.
2. Assign a Code number to the GL account.
3. Enter a Name for the code
4. Select the Type of account the new code will be
5. Select the Category used when grouping the GL codes on various financial reports
6. Select a Bank, if the account is to be used as an Operating or Reserve account, in order to help create checks through the AP application. Also enter the Account #, Routing # and the Next Check #.

To add a bank account the Chart of Accounts:
Prerequisites
•Banks must be entered and linked to a property before defining a bank account.
1. Scroll down to the bottom of the list and find the next blank set of fields
2. Assign a Code number to the GL account
3. Enter a Name for the code; Example, Bank of America Operating Account or Wells Fargo Reserve Account
4. Select the Type of account for the new code
a. Select Operating Account if the account is the main operating account
b. Select Reserve Account for a reserve account
c. Select Market Account for a money market account
d. Select Other Bank for any other accounts maintained at the bank
5. Select the Category used to group your bank accounts together on the financial reports
6. Define a Bank that was previously added through SETUP | Configuration Group | Program Defaults | Bank.
7. If the account is to be used to create checks through AP, also enter the:
a. Account # - The account number assigned by the bank
b. Routing # - The routing number of the bank
c. # of Signers - The number of signers required on the check from that specific account when using the online approval system
d. Next Check # Enter the check number that will be printed on the next check out of Accounts Payable
8. Additional information can be added such as Instrument Start, Maturity, Interest Rate, Initial Principal, and Par Value in cases where the account is a CD or even a Money Market account
|
Bank accounts will not show up through AP if the Account # , Routing #, a selected Bank or the Next Check # (is zero) are not defined. |