Budgets are used when creating budget comparison financial reports.
The Budget application is accessed through APPLICATIONS | General Ledger Group | Budget.
How to enter a new budget:
1.Select a Property.
2.In the Quick Access Toolbar, click the Add button ![]() . The following screen will appear:
. The following screen will appear:
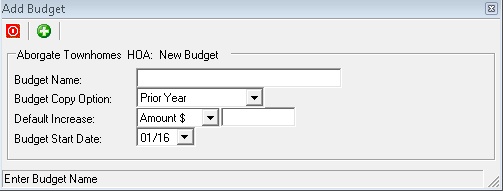
3.Enter a Budget Name.
4.Select a Copy Option.
The options are:
Option |
Description |
|---|---|
Copy Budget |
Allows the user to select any year's budget |
Prior Year |
Builds the budget from the prior year's actual data |
Rolling |
This option allows the user to select a date (mm/yy), which will be the current month of the new budget and the system will add eleven previous months, creating a twelve month budget. Example, 09/2016 is selected as the date to extract the first month of actual data, then the system adds actual data between 08/2016 - 10/2015. The idea of this type of budget is to create a budget with the most current actual data for a contiguous twelve month period. |
5.The user can select a Default Increase/Decrease which will pre-fill an amount (+/-) across all GL codes. The amounts can be altered per GL code prior to applying the changes to the budget.
Option |
Description |
|---|---|
Amount $ |
The program will increase or decrease each month by the Amount entered |
Equal = |
The program will set each month equal to the Amount entered |
Percent % |
The program will increase or decrease each month by the percentage Amount entered |
6.Enter an Amount (+/-).
7.Add a Budget Start Date.
8.Click on the Add icon ![]() to save the new budget.
to save the new budget.
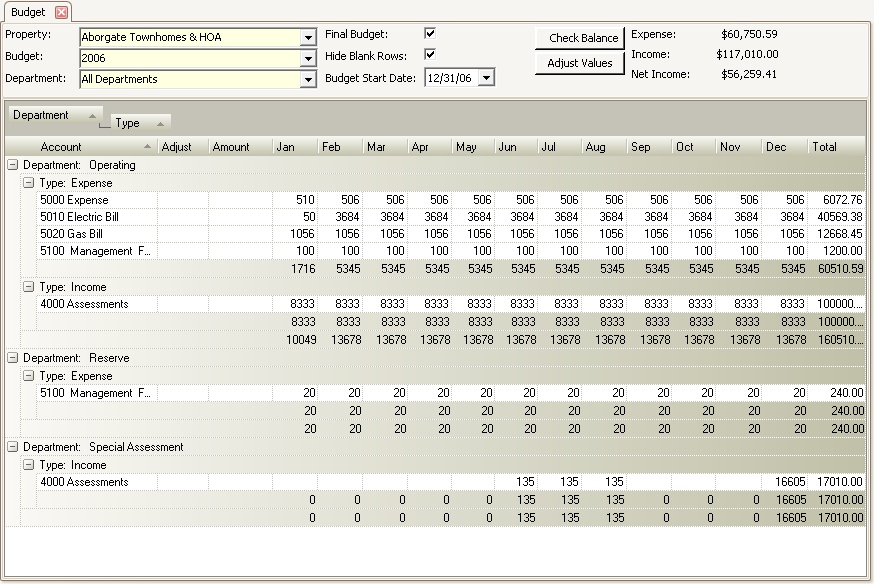
9.The new budget will appear in the budget grid, which can be modified for all department data at the same time or filter the budget data for a specific department.
10.Uncheck the Hide Blank Rows box to display all GL Accounts. When checked, the budget will only show GL codes with data entered.
Each cell can be manually modified, but the user can use the Adjust and Amount fields to affect every column within a row at the same time.
11.Within the Adjust column for a row, select a calculation method used to modify each cell.
The options are as follows:
Option |
Description |
|---|---|
Amount $ |
The program will increase or decrease each month by the Amount entered |
% |
The program will increase or decrease each month by the percentage Amount entered |
= |
The program will set each month equal to the Amount entered |
/ |
The program will divide the Amount entered into each month equally |
|
Amount and Type will be populated if selected during the initial budget creation. |
12.Enter an Amount (+/-) that will be used to adjust each cell
13.Press Adjust Values button once all adjustments have been entered to calculate the field(s).
14.Once all the budget information is entered, click the Check Balance button. This will balance out the Expenses and Income for a possible difference.
15.Click the Final Budget box, which tells the report system to use this budget when adding budget data into a financial report for the defined date period.
|
Columns in red denote an out of balance situation, whereas the expenses exceed the income. |
|
Only one budget can be finalized per year. Finalized budgets are used by various reports, including Budget to Actual (Budget Comparison) reports. |
Other Quick Access Toolbar tools that can be used:
![]() Refreshes (adds) any new GL codes added to a property after initial budget was entered.
Refreshes (adds) any new GL codes added to a property after initial budget was entered.
![]() Copies the current budget you have opened to create a new budget with the same information.
Copies the current budget you have opened to create a new budget with the same information.
![]() Aborts the changes made to the budget.
Aborts the changes made to the budget.