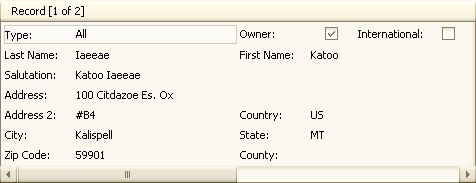
The system is capable of keeping track of several types of contacts for an owner's account. If an owner rents out their unit, a Property Management company can be entered to make sure correspondence is sent to them. If an owner lives off-site but has family living in their unit, like an elderly parent or a sibling, the owner's alternate mailing address can be entered so they can still receive information from their property.
|
Contact records are considered mailing addresses to the unit's address. |
Adding a Contact

How to add a Contact:
1. Search for and select the account that the contact person needs to be added to.
2. In the Information tab, right -click and select Add Contact.
3. Enter the new contact's information, such as:
Field |
Description |
|---|---|
Type |
Select the Type of contact this record will be. This will determine what kind of correspondence this individual will receive. All reports, labels and letters can be defined with parameters to use one or more contacts per account when rendering information.
All (0): This contact receives all correspondences. Billing (1): This contact receives coupons / statements Collection (6): Used to identify additional deed holders for delinquency letters Contact (3): Select this type to allow the contact access to discuss the account when calling / emailing any team member Mailing (2): This contact receives mailings not billing related (no coupon / statement) Management Company (4): Used if a management company manages the unit (can be included in compliance letters) Tenant (5): Used to identify a tenant that could receive news or compliance letters
The number followed by the contact type name, is the number that is represented in the database field under the ResidentContact table, rc_Type field, This can be used to only print certain letters or report for specific contact types.
Note: Do not enter tenant contact records if tenant sub-accounts are used in the same property. Changing strategies after data is entered will result in inconsistent results.
|
Owner |
Check this box to visually identify the contact as an Owner. This field has no impact in reporting nor VMS functionality. |
International |
Check this box if the contact has an international mailing address. |
First Name, Last Name |
Enter the resident's first and last name in the appropriate fields. |
Salutation |
The Salutation field can be used to add multiple names, Trust or other designations that identify the mailing address. Example, Michael and Sheri Jones can be entered when multiple residents reside at the mailing address. There are many areas of the system that will look to see if information is entered into this field and it will be used instead of the First and Last name when reporting information to labels, letters, billing coupons, etc. |
Address, Address 2, City, State, Zip Code |
Enter the resident's mailing address, if different from their unit address. Or enter their unit address. |
Country, County |
If applicable, enter the Country and/or County for the mailing address. |
4. To view all contacts, use the scroll bar below the contact's information.
|
You must have at least one contact record designated as "All" which means this contact will get all correspondence. |
Emailing a Contact
A user has the ability to email from within the system. One of the ways to email from within the system is to email an individual contact person on an account. Any contact record that has an email address can be emailed.
|
Multiple email addresses can be entered by separating each email with a semi-colon. The field allows up to 300 characters. |

How to email a Contact:
1. Verify that the contact record has an email address entered.
a. Search for and select the owner's account.
b. Search for and select the Contact record you want to email.
2. Once you have verified that the contact record has an email address, locate the Email, ![]() , button in the Email access toolbar.
, button in the Email access toolbar.
3. An Email window will pop up that will allow the user to define the fields necessary to send out the email. The From and Send To fields pre-populate with information that has been previously entered into the system. The other fields needed to send an email are:
a. Subject
b. Body
c. The Additional Email and Attachments fields are optional
4. Once all necessary fields are filled out, the user can then click the Send, ![]() , button.
, button.
|
Reports can be emailed using the User Report Panel. |
|
The system will add a note to the account with the email's text, plus attach an EML file that is the actual email for future retrieval. |