How to add a report to the VMSQueue:
1. In the Report Generator Report Selection tab, select a Report Group.
2. Select the desired Properties or Communities to be printed.
3. Select a report template(s) to export from the list of reports shown in the list on the left side of the screen.
4. Click the Add tool ![]() .
.
a. If one report is selected, the report is added to the Queue and the Queue Tasks tab is shown with the selected task.
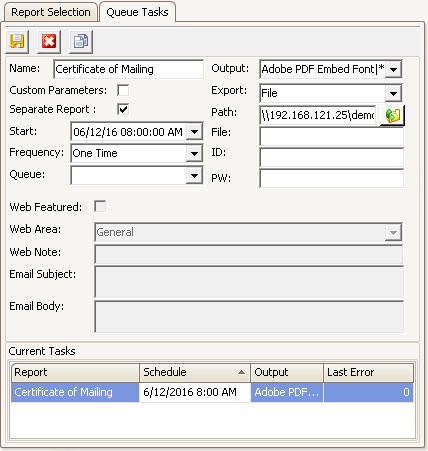
The fields in the Queue Tasks tab are defined as follows:
Field |
Description |
|---|---|
Name |
Used to identify the task event within the Current Task list |
Output |
Defaults with PDF. FileFusion tasks only export as PDF. |
Custom Parameters |
Used to alter any of the default parameters defined for the report through Group Definition. Not available with FileFusion report groups. |
Separate Report |
Used to generate a report per selected Property / Community. |
Export
|
Defaults with File. Options available are:
File: Saves the reports to the user's folder in the VMS Data folder defined in the Path field. FTP: File Transfer Protocol; Used to transfer files to a server on a computer network. iXpert: AP Financial's: Posts an entire FileFusion report group to the AP Financial's group which creates a record in VMS that is searchable in the iXpert application. iXpert: AR Financial's: Posts an entire FileFusion report group to the AR Financial's group which creates a record in VMS that is searchable in the iXpert application. iXpert: GL Financial's: Posts an entire FileFusion report group to the GL Financial's group which creates a record in VMS that is searchable in the iXpert application. SFTP: Secure File Transfer Protocol; Used to transfer files over a secure connection to a server on a computer network. eDistribution: Architecture: Emails the selected reports to the Architectural web group. eDistribution: Compliance: Emails the selected reports to the Compliance web group. eDistribution: Governing: Emails the selected reports to the Governing web group. eDistribution: Resident: Emails the selected reports to the Resident web group. This option will not be in the list for a FileFusion task if no resident contact based report is included in the report group. Website: Architectural: Posts the selected reports to the Architectural web group's web portal. Website: Compliance: Posts the selected reports to the Compliance web group's web portal. Website: Governing: Posts the selected reports to the Governing web group's web portal. Website: Resident: Posts the selected reports to the Resident web group's web portal. |
Path |
The path where to output the file.Defaults with the user's VMS Data folder path when File is selected in the Export field. If the Separate Report attribute is selected, a property folder will be created and all reports rendered for the specific property will be added.
Note: It is not recommend to alter the path. Although a UNC path can be used (network path), the path entered must be accessible to the VMS Queue program. Entering a drive letter A: - Z: is not useful and will cause the queue to generate an error because it does not typically have access to local or network drives. |
Start |
Defaults with the current date and the time defaults to the top of the next hour. This is the time this task will process in the Queue. |
File |
Field is blank but can be filled in with the name of the file for this scheduled event.The system will automatically add the property name to a rendered report and add the processing date and time to the file name if rendered separately. Tokens can be entered into the file name, which are used to manage the report name. The tokens available are:
[NC]: Tells the Queue to not alter the given report name. Date inserts: [YYYYMMDD], [MMDDYY], [DATE], [MMDDYYYY], [HHMMSS], [HHMM], [TIME], [SHORTDATE], [LONGDATE], [SHORTTIME], [LONGTIME] Day / Month inserts: [D] (day number), [DDDD] (name of day), [MM] (month number), [MMMM] (name of month) Property inserts: [TAXID], [COMPANYNAME], [COMPANYKEY]
|
Frequency |
Allows the user to select how often this Queue task is to be processed.Options are Daily, Hourly, Monthly, One Time, Weekly.The Queue will automatically advance the Start time to the next Frequency after processing. |
ID and PW |
Used when the Queue task needs specific log in credentials to process, such as when FTP or SFTP is selected from the Export menu. |
Queue |
The user environment can have multiple VMS Queue services running. Any additional queues are assigned a Queue ID, which are then assigned to tasks. This configuration allows for distributed report rendering and load balancing of tasks across multiple servers or departments and allows for user group (accounting, managers) printers. Queue IDs are defined through SETUP | Configuration Group | Program Defaults | Codes. |
Web Featured, Web Area, Web Note |
Used to post this report group to the web portal for viewing by the available web groups. Used when one of the Website Export options is selected.
Web Feature: When checked, the system will add the document to the Home page of the VMS website. Web Area: Select the area that the document is added to. Web Note: Enter the description of the web document when added to the website.
|
Email Subject and Email Body |
Available when one of the eDistribution Export options is selected. Used when the reports in the group do not have pre-defined Email Subject and Email Body parameters.
Email Subject: Enter the subject information for the email. Email Body: Enter the email body information for the email.
Tokens can be used in both fields. See File definition. |
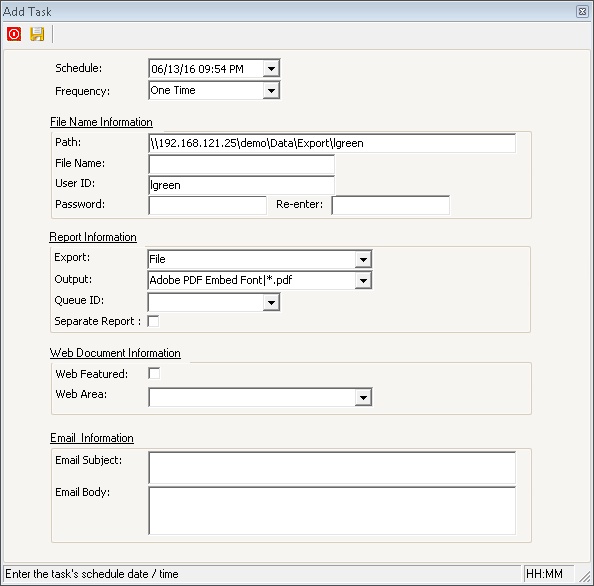
b. If several reports are selected by using the Ctrl key to choose each desired report, or the Shift key is used to select a range of reports, the Add Task form is displayed to allow the user to manage the Queue task attributed used by the Queue for all reports, which can later be modified per report. These fields are defined as described above.
5. Once all parameters are defined, click the Save icon ![]() . This will add the task to the Queue for processing.
. This will add the task to the Queue for processing.
6. When the task processes in the Queue, the user that created the queued report will receive an email that the task has completed.