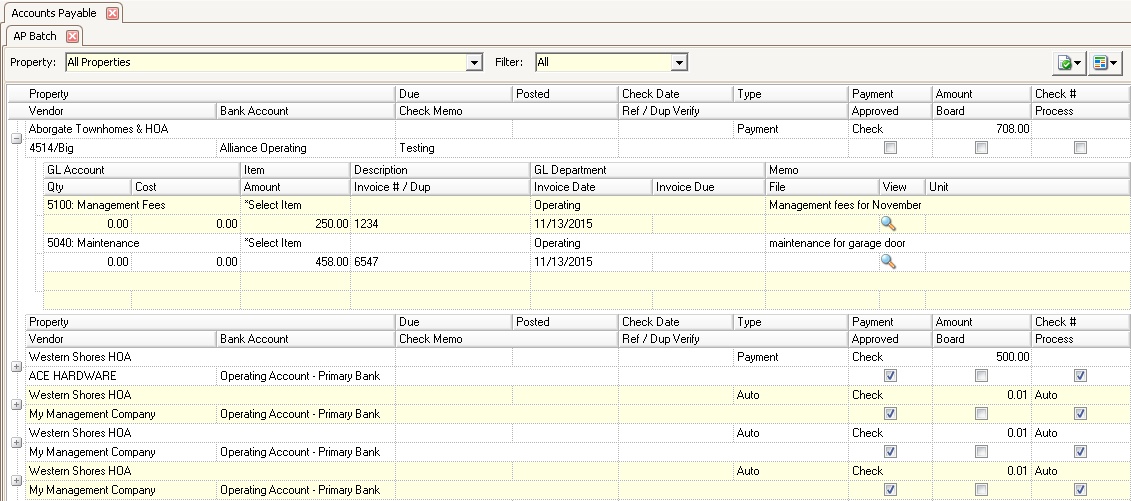
Entering vouchers in the Batch application allows the user to enter multiple vouchers for multiple properties or for one specific property.
To create an AP Batch, this area is accessed through APPLICATIONS | Accounts Payable Group | Batch.
How to enter an AP batch:
1.Select All Properties or a single Property.
2.Go down to the next set of blank rows and select a Vendor.
3.Select a Bank Account. This field will default to the first account entered in the Chart of Accounts.
4.Enter the Due date of the voucher
5.Enter the Posted date (The date the voucher will post to the GL).
6.Enter the Check date (The date which prints on the check).
7.Select a Type:
Field |
Description |
|---|---|
Auto |
Used when a vendor is debiting the management company directly for payment. For example, an automatic payment defined with an electric company. |
Manual |
Used when the user is going to hand-write a check from a checkbook. When selected, the user should enter the Check # manually created for reference. |
Payment |
The most widely used type. This allows the user to print a check out of VMS using any type of check stock. |
Work Order |
Allows the user to flip a voucher back to a Work Order which can then be manipulated in the Work Order application. |
8.The Payment field should be left as Check.
9.The Amount field will populate with the total amounts entered in the Expenses tab. Further explanation below.
10.The Check # will generate from the previous check number used or what the user setup in the Chart of Accounts area, with exception to Manual vouchers, where the user should enter the Check # manually created for reference purposes.
11.Any data placed in the Check Memo field will print on the check.
12.The invoice number can be entered in the Ref/Dup Verify.
The Expense / Item entries are managed from the same grid of information by clicking the plus sign![]() next to the voucher.
next to the voucher.
|
Properties, Bank Accounts or Vendors will not show in this application if there are no vendors linked to the property, bank accounts are not defined, a GL code does not have an account or routing number defined and the next check number is not greater than 0. |
How to enter invoice expenses:
1.Click the plus sign ![]() next to the voucher to enter the Expenses.
next to the voucher to enter the Expenses.
2.There are two ways to enter an Expense
i.Select the Expense Account
ii.AP Item
3.Select the GL Department.
4.Enter the Memo. This information will appear on the check stub.
5.Enter the Amount.
6.Enter the Invoice # / Dup Verify. This allows VMS to catch any duplicate invoice numbers which are being placed in the system. This will warn the user that the invoice number already exists in the system.
7.Enter the Invoice Date, which will post to the GL as the Transaction Date.
8.Enter the Invoice Due date.
9.A File can be uploaded, such as the vendor's invoice, to be viewed at a later date.
10.Select a Resident's Unit, if applicable.
