There are several ways to enter vouchers into the system. They can be entered into each property separately or they can be entered on one screen for all properties. Both options will be discussed and then the user can decide the one that works best for them.
|
Vouchers can be imported into the system, but this is an advanced topic. |
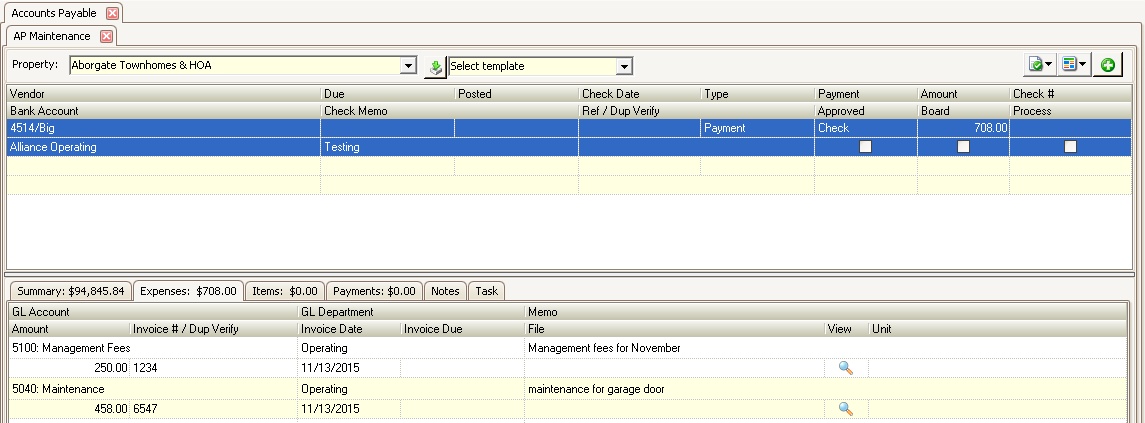
To enter vouchers for one property at a time, go into APPLICATIONS | Accounts Payable Group | Maintenance.
How to enter a new voucher:
1. In the AP Maintenance tab, select a Property
2. Select a Vendor using the dropdown menu
3. Select a Bank Account. This field will default to the first account entered in the Chart of Accounts.
4. Enter the Due date of the voucher
5. Enter the Posted date (The date the voucher will post to the GL)
6. Enter the Check date (The date which prints on the check)
7. Select a Type:
Field |
Description |
|---|---|
Auto |
Used when a vendor is debiting the management company directly for payment. For example, an automatic payment set up with an electric company. |
Manual |
Used when the user is going to hand-write a check from a checkbook. When selected, the user should enter the Check # manually created for reference. |
Payment |
This type prints a check out of VMS using the defined check template. |
Work Order |
Allows the user to flip a voucher back to a Work Order which can then be manipulated in the Work Order application. |
8. The Payment should be left as Check.
9. The Amount field will populate with the total amounts entered in the Expenses tab. Further explanation below.
10. The Check # will generate from the previous check number used or what the user setup in the Chart of Accounts area, with exception to Manual vouchers, where the user should enter the Check # manually created for reference purposes.
11. Any data placed in the Check Memo field will print on the check.
12. The invoice number can be entered in the Ref/Dup Verify, which will cross reference any prior vouchers entered for the selected property. The user will be notified if a duplicate is located.
|
Properties, Bank Accounts or Vendors will not show in this application if there are no vendors linked to the property, bank accounts are not defined, a GL code does not have an account or routing number defined and the next check number is not greater than 0. |
How to enter invoice expenses:
1. Click on the Expense tab
2. Select the GL Expense Account
3. Select the GL Department
4. Enter the Memo. This information will appear on the check stub.
5. Enter the Amount
6. Enter the Invoice # / Dup Verify. This allows VMS to catch any duplicate invoice numbers which are being placed in the system This will warn the user that the invoice number already exists in the system for the Property and Vendor defined.
7. Enter the Invoice Date, which posts to the GL as the Transaction Date.
8. Enter the Invoice Due date
9. A File can be uploaded, such as the vendor's invoice, to be viewed at a later date.
10. In the Unit field, select an account, if applicable.This is primarily used for work orders.
Within AP Maintenance, each voucher has additional information that can be found in the following tabs:
Tab |
Description |
|---|---|
Summary |
When a voucher is highlighted, the Summary tab will show:
Vendor's name and mailing address Insurance Information Expense and item amounts entered for the voucher Bank account balance GL account balance Past several months of payments to the vendor
|
Items |
The Items tab shows the per unit cost of items previously defined in SETUP | Property Group | Property Setup | Accounting | AP | Item. Items are defined to allow the end user to select a common name for an expense, without knowing how to code the expense using a chart of account entry. Items are also used in the Work Order application. |
Payments |
Allows the user to see any previous payments made on the selected voucher. Within this tab, the user may right-click on any listed payments and choose from the following:
Retrieve Check Image: When selected, the system will retrieve the image of the check received by the bank. Available only with applicable banks. Reprint: When selected, the user may reprint the check. Void Check: When selected, the system will void only the selected payment. It will then put the voucher back into AP as an unpaid item.
|
Notes |
Shows all primary user actions taken against the voucher (who Approved, Processed the voucher). Additional notes and/or documents can be manually added through this tab. |
Task |
Allows user to assign a voucher task to another user. VMS will email the user that they have been assigned a task with a specific due date. The user can review the task using Task Management. |