All Vendors that a property uses must be entered in SETUP | Configuration Group | Program Defaults | Vendor.
How to add a vendor:
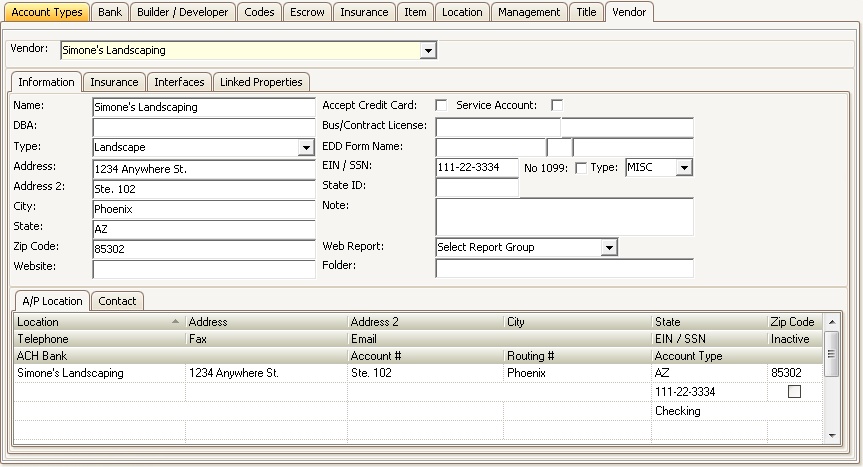
1. Enter the Vendor's Name.
2. Enter the Vendor's DBA, if needed.
3. Select the Type of vendor you are adding.
4. Enter the Vendor's Address in the appropriate fields.
5. Enter the Vendor's EIN/SSN for tax purposes.
6. If the Vendor does not need to received a 1099, check the No 1099 box.
7. Select the Type of 1099 the Vendor is to receive. This field defaults to MISC which is the most commonly used 1099 form.
8. Select a Report Group is the vendor will be given access to the web portal to run real-time reports based on the reports added to the Report Group selected.
9. In order for the Vendor's information to show up in the Accounts Payable application, their information must be entered in the AP Location tab. To do this, click the Copy icon ![]() in the Quick Access Toolbar. All information in the upper half of the window will be copied to the AP Location tab.
in the Quick Access Toolbar. All information in the upper half of the window will be copied to the AP Location tab.
|
A vendor location must be added to the master vendor record. Several locations (remit to addresses) can be added per master vendor record, which are then used to create vouchers and memorized AP items. |
The other areas of the Vendor setup are defined as follows:
Tab |
Description |
|---|---|
Insurance |
The user can add the corresponding insurance companies for a vendor in order to be prompted by the AP application if a policy has expired. Other types of expired records can also be added, such as W9 information. This information is reviewed and displayed through AP and the Task Management application. |
Interfaces |
The user can allow the vendor access to the website area to help manage delinquent homeowners if the COLLECTION ACCESS box is checked. eDistribution information (web service URL, user and password) can be defined in this tab, which identifies the vendor managing electronic distribution of compliance and delinquency letters created in VMS for off site printing. |
Linked Properties |
Allows the user to link the Vendors to the properties that use them. |
Contact |
The vendor's contact information. Note: Entering the user / password for a contact record gives the vendor access to the vendor portal and real-time data accessing using VMSXChange. |
|
Vendors can also be added using VMSImport and a CSV file (see the VMSImport document available through the VMS Help Panel for a more detailed explanation of the utility). |