The user is able to manually enter journal entries that will effect the GL accounts.
The Journal Entry application is accessed through APPLICATIONS | General Ledger Group | Journal Entry.
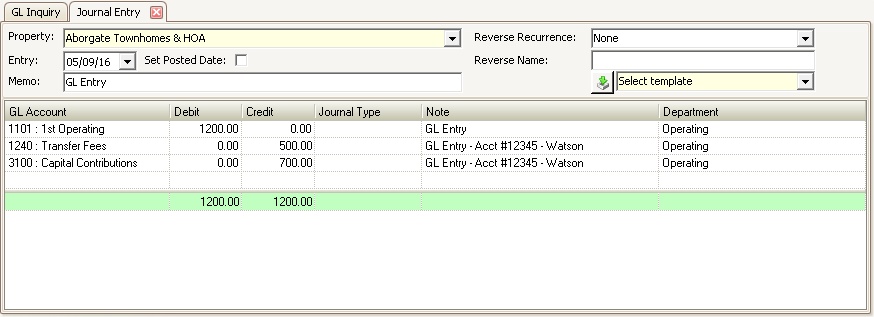
How to setup a journal entry:
1. Select the Property.
2. Select the Entry date. This is the transaction date for the period the entry should be posted to.
3. Check the Set Posted Date box if you want the entry transaction date and posted date to be the same.
4. Enter the Memo. The default is GL Entry but the user may enter a memo that better defines the transaction.
5. Select the Reverse Recurrence, if necessary. This is the time frame for the reverse batch when the entry is posted.
6. Enter the Reverse Name, if necessary. This is the name used for the reverse batch entry.
There is also the option to import journal entries into the system by using the Import button, ![]() . The user can fill out a spreadsheet with the following column headings: COA, Debit, Credit, Memo. The spreadsheet is saved as a CSV file and can either have the column headings or not. Both are available as a option. The system will pull all the information from the spreadsheet into the Journal Entry application for the user to post.
. The user can fill out a spreadsheet with the following column headings: COA, Debit, Credit, Memo. The spreadsheet is saved as a CSV file and can either have the column headings or not. Both are available as a option. The system will pull all the information from the spreadsheet into the Journal Entry application for the user to post.
How to enter a journal entry:
1. Select the GL Account.
2. Enter the Debit or Credit amount. Two or more entries will need to be entered so that the totals of the Debit and Credit columns equal each other.
3. Select the Journal Type.These are defined through Setup | Program Defaults | Codes.
4. The Note field will pre-populate with the information in the Memo field above. Further details can be added to the Note field if necessary.
5. Select the Department for the journal entry.
6. In the Quick Access Toolbar, click the Post button ![]() .
.
|
Any journal entry can be saved as a Memorized entry by right-clicking prior to posting and selecting "Save Memorized". |
|
Memorized journal entries can be loaded into the Entry screen by right-clicking and selecting "Load Memorized" before entering any GL codes. |
|
If using a participating bank, the Electronic Transfer checkbox will be available next to the Property dropdown. If used, the system will allow for a bank account to bank account transfer directly through VMS. Prior to posting an entry, the system will generate a transfer report to allow the user to confirm the transaction.
Once the transfer is posted, the same report is created, but with the bank confirmation number and posting date added to it. The report is created as a PDF file and attached as a property note, which can be accessed through iXpert, FileFusion or Property Notes. |