The New Account application allows the user to create or select an existing unit within the property, then add a new account to the unit.
By adding a new account, the program will create a new record and inactivate any existing accounts. Select the Abort, ![]() , icon in the Quick Access Toolbar to undo this modification in case the wrong unit is selected.
, icon in the Quick Access Toolbar to undo this modification in case the wrong unit is selected.
The New Account application is accessed through APPLICATIONS | Account Maintenance Group | New Account.
The filter fields are further defined:
Field |
Description |
|---|---|
Property |
Selects the property to which a new account will be added |
Unit |
Selects the unit to which a new account will be added |
Add Unit |
If a unit does not exist within a property, the user can add a new unit using this tool |
Other application attributes are further defined:
Field |
Description |
|---|---|
Prior Account area |
Displays the current account attached to the unit |
New Account button |
Starts the process of adding a new account to the selected unit |
New Account area |
Used to enter the new account information to the unit selected |
How to add a New Account:
1.Select the property.
2.Select the resident's unit.
3.Click the ![]() button.
button.
4.Enter any new contacts to the account in the New Account tab
5.Enter any new Billing records that pertain to the account.
6.Enter the new Leasing information.
7.Enter any new transactions to the prior and / or new account. Transactions can be clicked and dragged between the same tabs of the Prior (left pane) and New (right pane) Accounts.
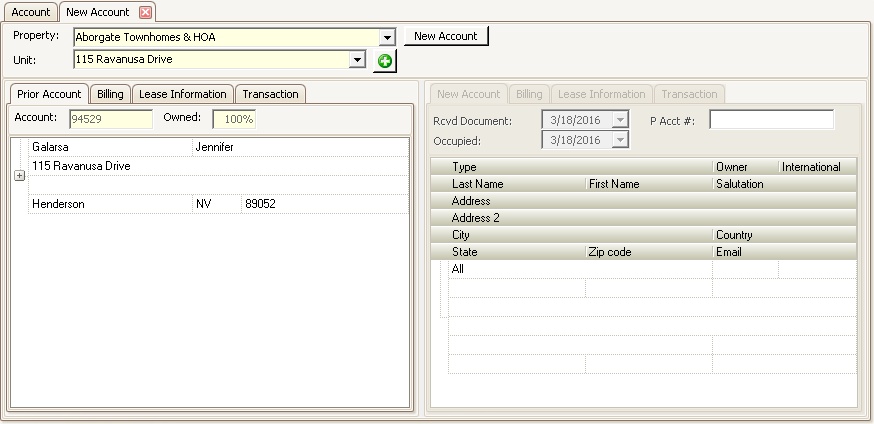
When the New Account button is selected, the following screen is displayed:
Prior Account (left pane):
The Prior Resident area is further defined:
Field |
Description |
|---|---|
Prior Account tab |
Shows current resident attached to unit. |
Billing tab |
Shows any current account's billing records for the unit that can be moved to the new resident. You can drag / drop a billing record from the Old Account to the New Account. |
Lease Information tab |
Shows the current lease information. |
Transaction |
Shows the current resident transactions, which can be voided from the account or moved to the new resident. You can drag / drop a billing record from the Old Account to the New Account. |
New Account (right pane):
The New Account area is further defined:
Field |
Description |
|---|---|
Rcvd Document |
Select a date to identify when the New Account paperwork was signed. |
Occupied |
Select a date when the occupant resided in the unit. |
P Acct # |
Enter any prior account number that may be associated with the new account. This field is used when processing lockbox files. The Lockbox process will identify accounts using the VMS generated number first, then prior account number when posting payments. |
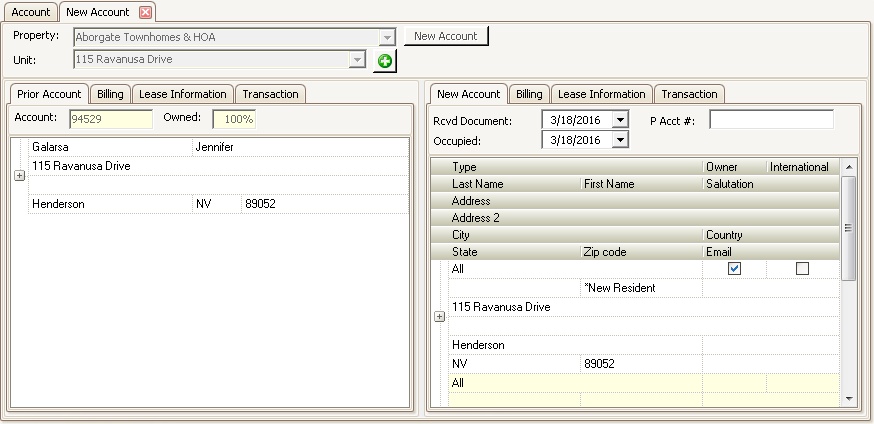
Account contact records |
Enter a minimum of one contact record, but more can be added in this area. The addresses entered are considered mailing (contact) addresses. Any information entered here will not affect the unit address. |
Contact Entry:
When the New Account button is selected, the program creates a contact record for the system. You must enter at least one contact record for an account defined as All.
Each account contact record entered is defined with an Contact type, which designates the type of mailings (letters, labels, etc..) the address will receive and are further defined. Note: All letters and report templates (labels, envelopes, etc..) can have parameters defined that filter the information exported out of VMS. Example: You want to generate a mailing out of the system for tenants only and do not want to include the owners. A label report can be configured to give a user the option to select only tenants, filtering out all other contact records defined on the accounts.
Contact Type |
Description |
|---|---|
All |
All contact records indicate that all mailings should be sent to this record (the system allows you to filter information prior to printing). The All contact type designates at least one owner of the property. Note: You MUST have at least one All contact type entered for an account, otherwise VMS will not function properly! |
Billing |
Billing contact records indicate any additional addresses that should receive coupons / statements from the system. |
Collection |
Collection contact records should receive delinquency letters rendered by the system. This type of contact can be additional deed / title holders of the unit. |
Contact |
Contact records designate a person that can access the account, but not receive any mailings (example: a relative who is managing the unit while the current resident is out of town). |
Mailing |
Mailing contacts can be used to send information other than billing documents (example: newsletters or general information). |
Management Company |
Management Company contact records can be used to send notifications (example: compliance letters) to a third party group that manages a unit on behalf of the current resident. |
Tenant |
Tenant contact records indicates a tenant that occupies an owner unit (owners must be entered as All contact records). Note: Do not enter tenant contact records if tenant sub-accounts are used in the same property. Changing strategies after data is entered will result in inconsistent results. |
Enter any pertinent information for the first contact record, then add additional contacts as needed. Select the blank row below the last contact and enter the data.
If the new contact address is the same as the unit address, the user can select the Copy ![]() icon on the toolbar and the unit address information will be automatically copied into the new contact record.
icon on the toolbar and the unit address information will be automatically copied into the new contact record.
The Billing tabs allows the user to either select and drag a billing record attached to the prior account or enter a new billing record to the new account. Billing records can be added to a community for processing charges to all accounts within a community and/or defined for each individual resident. During the billing process, the program posts any defined recurring community billing, adds any recurring unit billing, then adds any additional account billing defined for individual accounts.
|
If the unit being defined is a Builder Billing Unit, any billing records defined will be used to post charges for each builder owned unit, unless the builder owned unit has an account attached and no specialized recurring billing matrix is defined. |
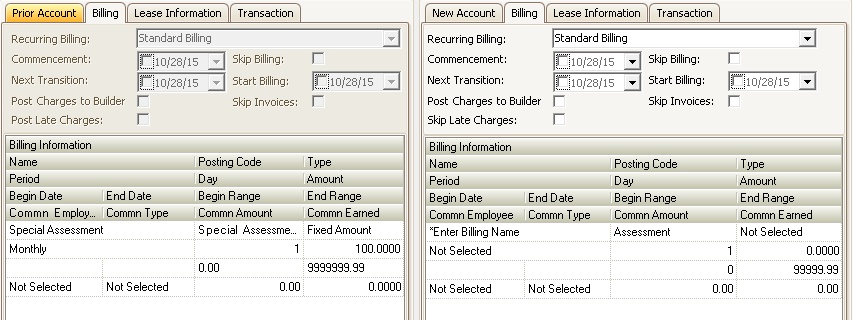
In this example, the prior account was being billed for a Special Assessment. The fee was charged monthly at a fixed rate of $100.00. The user can click and drag this record to the new account and/or enter any other billing to the new account that is applicable.
Additional fields are further defined:
Field |
Description |
|---|---|
Recurring Billing |
Select the recurring billing matrix used to post additional recurring charges for this account. The field is auto-populated based on the default entries selected for the unit. |
Commencement |
Select a date to identify when the account holder was responsible for the unit. |
Skip Billing |
Select this checkbox if the account is ignored during the recurring billing processes. |
Next Transition |
Select a date to identify when this account should move to another recurring billing matrix. This field can be used for reporting purposes and to manage the recurring billing defined for a unit. |
Start Billing |
Select a date when the account should be included when processing recurring billing. |
Post Charges to Builder |
Select this checkbox if all charges for this account should be posted to a Builder Billing Unit. |
Skip Invoices |
Select this checkbox to filter this account from receiving coupons / statements. |
Skip Late Charges |
Select this checkbox if the account does not receive any late charges and/or letters. |
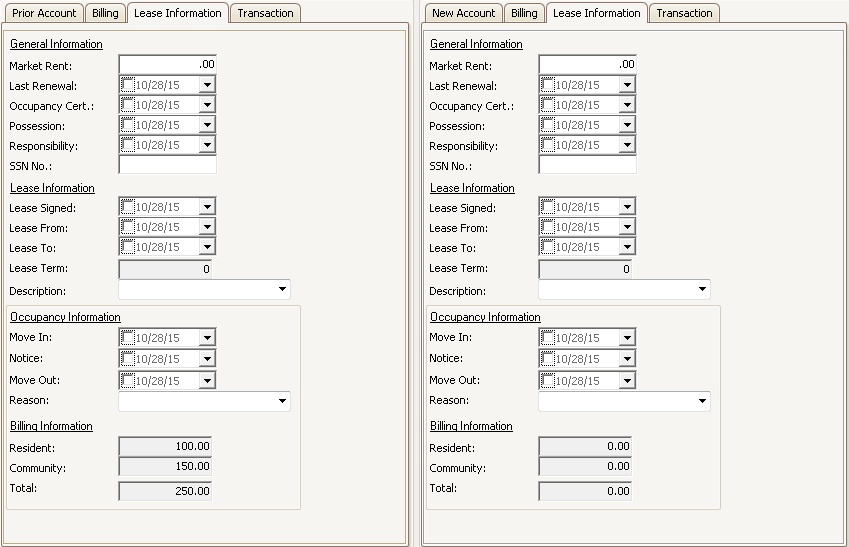
Lease Entry
The Lease Information tab allows for the entry of account leasing information, which is typically used for reporting purposes.
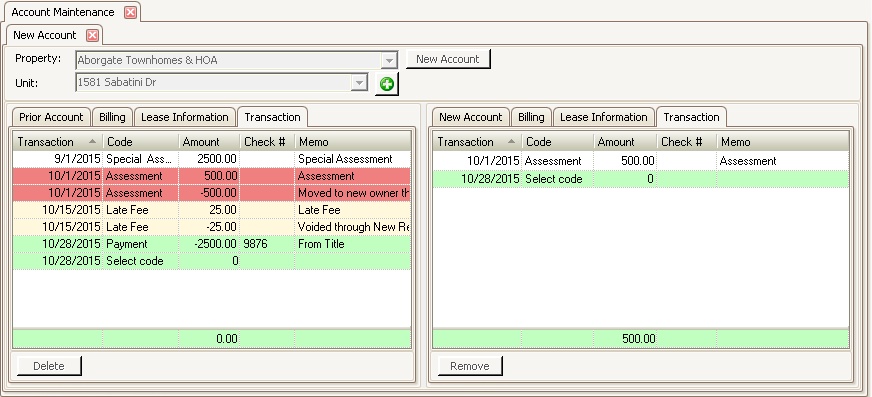
Transaction Entry
The Transaction tab allows the user to click and drag any transaction records from a prior account to the new account, void a prior transaction (i.e.: late fees) from the prior account and allow for the entry of additional transactions on both accounts.
This example shows a couple of common entries that can be managed through this area:
1.An assessment dated 10/1/15 for $500 was moved to the new account, which created an offset record with a date of 10/1/15 for -$500 on the prior account.
2.The Late Fee of $25 was voided, which created an offset adjustment record of -$25.
3.A payment was added to bring the prior account to $0.00.
How to manage transaction records:
During an account transfer, transactions can be entered for both the prior and new accounts before posting the changes.
1.Select the Transaction tab for the prior or new resident.
2.Move a transaction by clicking the desired prior transaction entry and dragging and dropping the item to the new account.
3.Select a transaction for the prior account and pressing the Void button creates an offset adjustment record to the prior account.
4.Enter a new transaction for either the prior or new account by selecting the last row of either transaction grid, selecting the posting code to post, entering the amount of the transaction, check number and memo.
|
When adding or moving any credits to either account, the system will create a Cash adjustment batch for the user managing the accounts. The batch must be posted manually through Adjustments in order to update the accounts. The idea is to post all of the cash receipts for new accounts and create one deposit batch. |
|
When a transaction on the prior account is selected, a Void button, |
Posting Information
When all of the data is entered, press the Post button, ![]() , in the Quick Access Toolbar which posts the data for the prior and new accounts. If credit transactions are entered for either account, the program will add the transactions to a cash adjustment batch, which can be processed at a later time to post all credits as a deposit batch.
, in the Quick Access Toolbar which posts the data for the prior and new accounts. If credit transactions are entered for either account, the program will add the transactions to a cash adjustment batch, which can be processed at a later time to post all credits as a deposit batch.