How to process a FileFusion report group:
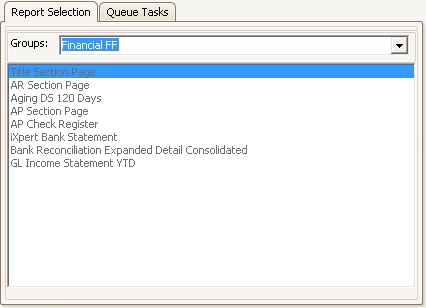
1. Go to Reporting | Report Generator.
2. Select the property names from the Property tab to render the reports for.
3. In the Report Selection window, select the FileFusion report group.
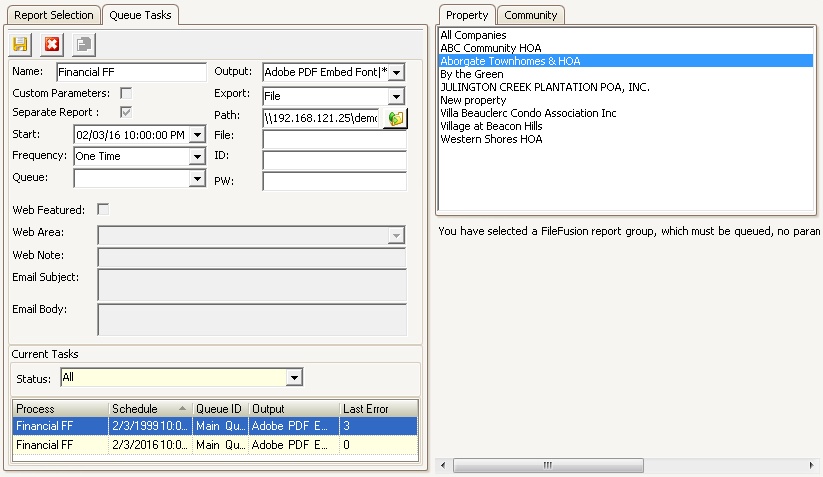
4. Click the Add button, ![]() , in the toolbar to create a Queue task to process this FileFusion report group. The Queue Tasks tab now appears to allow the user to further define this Queue task.
, in the toolbar to create a Queue task to process this FileFusion report group. The Queue Tasks tab now appears to allow the user to further define this Queue task.
5. The following fields are available for review and/or modification:
Field |
Description |
|---|---|
Name |
Used to identify the task event within the Current Task list |
Custom Parameters |
Used to alter any of the default parameters defined for the report through Group Definition. Not available with FileFusion report groups. |
Separate Report |
Used to generate a report per selected Property / Community. |
Start |
Defaults with the current date and the time defaults to the top of the next hour. This is the time this task will process in the Queue. |
Frequency |
Allows the user to select how often this Queue task is to be processed.Options are Daily, Hourly, Monthly, One Time, Weekly.The Queue will automatically advance the Start time to the next Frequency after processing. |
Queue |
The user environment can have multiple VMSQueue services running. Any additional queues are assigned a Queue ID, which are then assigned to tasks. This configuration allows for distributed report rendering and load balancing of tasks across multiple servers or departments and allows for user group (accounting, managers) printers. Queue IDs are defined through SETUP | Configuration Group | Program Defaults | Codes. |
Output |
Defaults with PDF. FileFusion tasks only export as PDF. |
Export
|
Defaults with File. Options available are:
File: Saves the reports to the user's folder in the VMS Data folder defined in the Path field. FTP / SFTP: Used to upload a report to an external FTP or SFTP server (a user / password is generally defined for this type). iXpert AP / AR / GL Financial's: Reports can be automatically added as a Property Note, defined with one of these area types. The ideal usage for adding financial reports back to the system as a property note with a file attached is to avoid having to scan the monthly financial report, then manually adding the document to the property. A recurring task can be configured to create the report and add it to one of the financial areas, which can then be used for exporting or reporting purposes in the future. Example, an auditor needs to access all past financial reports for a property. If the reports are added to the property each month, the user can use iXpert to easily search for all financial documents in a single screen for all properties. eDistribution: Architecture: Emails the selected reports to the Architectural web group. eDistribution: Compliance: Emails the selected reports to the Compliance web group. eDistribution: Governing: Emails the selected reports to the Governing web group. eDistribution: Resident: Emails the selected reports to the Resident web group. This option will not be in the list for a FileFusion task if no resident contact based report is included in the report group. Website: Architectural: Posts the selected reports to the Architectural web group's web portal. Website: Compliance: Posts the selected reports to the Compliance web group's web portal. Website: Governing: Posts the selected reports to the Governing web group's web portal. Website: Resident: Posts the selected reports to the Resident web group's web portal. |
Path |
The path where to output the file.Defaults with the user's VMS Data folder path when File is selected in the Export field. If the Separate Report attribute is selected, a property folder will be created and all reports rendered for the specific property will be added. |
File |
Field is blank but can be filled in with the name of the file for this scheduled event.The system will automatically add the property name to a rendered report and add the processing date and time to the file name if rendered separately. Tokens can be entered into the file name, which are used to manage the report name.
The tokens available are: [NC]: Tells the Queue to not alter the given report name. Date inserts: [YYYYMMDD], [MMDDYY], [DATE], [MMDDYYYY], [HHMMSS], [HHMM], [TIME], [SHORTDATE], [LONGDATE], [SHORTTIME], [LONGTIME] Day / Month inserts: [D] (day number), [DDDD] (name of day), [MM] (month number), [MMMM] (name of month) Property inserts: [TAXID], [COMPANYNAME], [COMPANYKEY] |
ID and PW |
Used when the Queue task needs specific login credentials to process, such as when FTP or SFTP is selected from the Export menu. |
Web Featured, Web Area, Web Note |
Used to post this report group to the web portal for viewing by the available web groups. Used when one of the Website Export options is selected.
Web Feature: When checked, the system will add the document to the Home page of the VMS website. Web Area: Select the area that the document is added to. Web Note: Enter the description of the web document when added to the website.
|
Email Subject and Email Body |
Available when one of the eDistribution Export options is selected. Used when the reports in the group do not have pre-defined Email Subject and Email Body parameters.
Email Subject: Enter the subject information for the email. Email Body: Enter the email body information for the email.
Tokens can be used in both fields. See File definition. |
6. Once all necessary changes are made and all properties have been selected, click the Save button, ![]() .
.
7. The fields in the Queue Tasks tab will then gray out.
8. The queue will process the task based on the start date / time
|
You can modify a queue event prior to being processed by double-clicking a task listed in the Current Task grid. The queue task will load in the Queue Tasks fields. Press the Save |