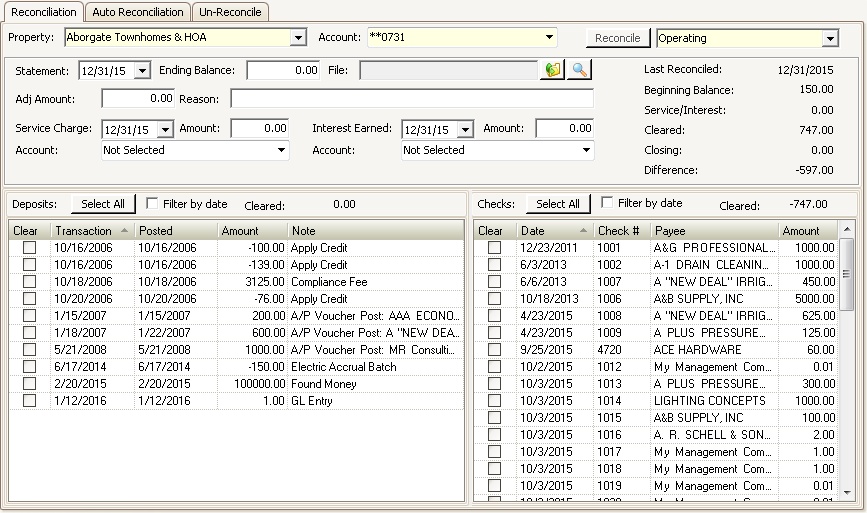
The Reconciliation tab allows the user to view all transactions entered in VMS through adjustments, journal entries and bank transactions, such as Lockbox processing.
How to reconcile an account:
1.Select a Property.
2.Select an Account.
3.Click the Reconcile button.
4.Enter the Statement date from the bank statement (typically the Last Business Day of the month).
5.Enter the Ending Balance from the bank statement.
6.Attach the bank statement File, if needed. Press the browse button ![]() in the Quick Access Toolbar.
in the Quick Access Toolbar.
a.If using a participating bank, the system will automatically download the statement file
b.The browse window will open to allow the user to locate and attach the statement from the workstation or server
|
It is recommended that you attach an unsecured PDF statement file, which can be used as a merge document during a FileFusion report rendering. |
|
Use the View button |
7.Enter the Adj Amount to balance the difference. The amount entered does not create a journal entry, but is used for balancing the period. The amount entered only creates the adjustment for the current statement period and must be reversed in the following month once the offsetting entry is made through the GL or bank.
8.Enter a Reason for the adjustment.
9.Enter the Service Charge date, if any.
10.Enter the Amount of the service charge, if any.
11.Select the GL Expense Account.
12.Enter the Interest Earned date, if any.
13.Enter the Amount of the interest earned, if any.
14.Select the GL Income Account.
15.Check the Filter by Date box to only show transactions up to the Statement date previously entered.
16.Press the Select All button ![]() in the Quick Access Toolbar to check the boxes for all transactions currently listed on the screen OR individually check off the deposits (listed on left) and the checks (listed on right) that have cleared the bank.
in the Quick Access Toolbar to check the boxes for all transactions currently listed on the screen OR individually check off the deposits (listed on left) and the checks (listed on right) that have cleared the bank.
Press the Post button ![]() to complete the reconciliation.
to complete the reconciliation.
Additional fields are further defined:
Field |
Description |
|---|---|
Last Reconciled |
Gives the user a date for the previous reconciliation. |
Beginning Balance |
Taken from the last closing balance from the previous reconciliation. |
Service/Interest |
The total of Service Charges and Interest Earned. |
Cleared |
Shows the total of checks and deposits that have cleared the bank. |
Closing |
Shows the closing balance from the statement being reconciled. |
Difference |
Shows the amount that has not cleared. |