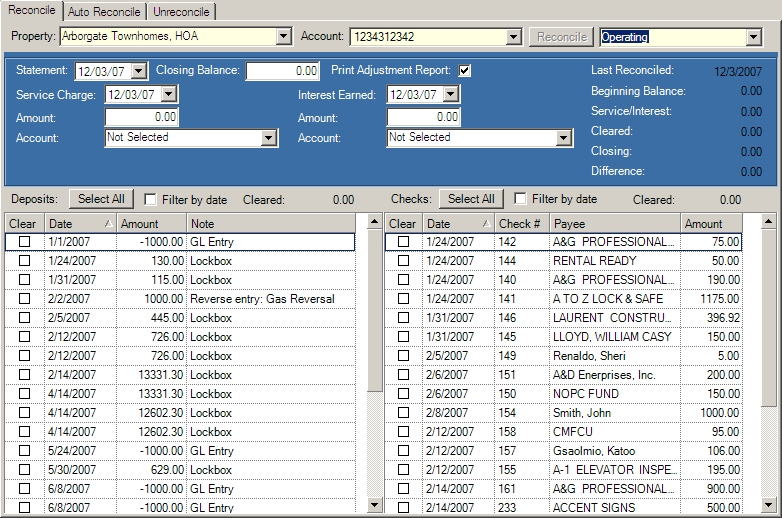
The Reconcile screen allows the user to select a property and reconcile a selected bank account within that property. Each account is listed with its corresponding department, where applicable (see: Setup/Property Setup/Accounting/GL/Departments).

The fields are further defined:
Field |
Description |
|---|---|
Statement Date |
Enter the statement date. |
Closing Balance |
Enter the closing balance on the statement. |
Print Adjustment Report |
Select to print an adjustment report upon posting. |
Service Charge |
Enter the service charge date. |
Amount |
Enter the service charge amount. |
Account |
Select the corresponding G/L Account. |
Interest Earned |
Enter the interest earned date. |
Amount |
Enter the amount of interest earned. |
Account |
Select the corresponding G/L Account. |
Last Reconciled |
Displays the last reconciled date |
Beginning Balance |
Displays the beginning balance from the G/L. |
Service/Interest |
Displays the service fee minus the interest earned. |
Cleared |
Displays the total amount of checks "cleared" from A/P. |
Closing |
Displays the closing balance reflecting the beginning balance minus the service fees and cleared accounts. |
Difference |
Displays the difference in the bank's closing balance versus VMS transactions. |

How to Reconcile an Account:
1.Select a property from the drop-down menu.
2.Select the necessary bank account and its corresponding department.
3.Click on the Reconcile ![]() button.
button.
4.If consolidated reconciliation is defined (see Setup/Property Setup/Accounting/GL), select the department to post any service or interest information
5.Deposits will populate on the left side of the screen; checks will appear on the right side.
6.Check off each cleared deposit and check reflected in the bank statement.
7.Upon satisfactory reconciliation, select the Post ![]() icon to post the transactions and print a reconciliation report.
icon to post the transactions and print a reconciliation report.