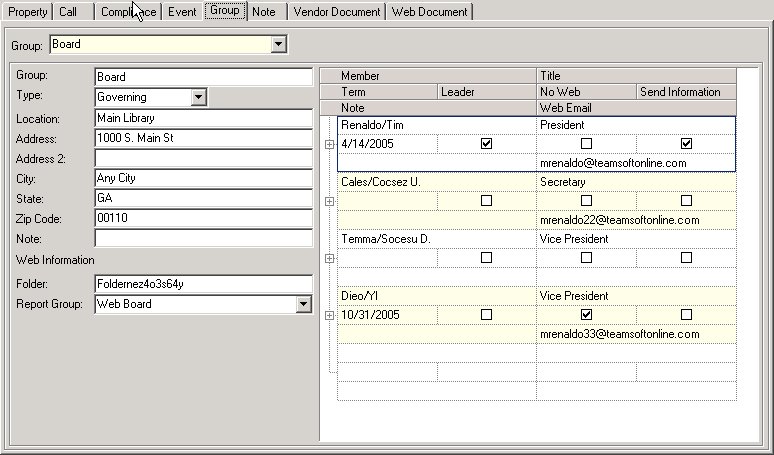
The Group tab is used to manage groups that are entered in the system and determine things such as report parameters and web access.

The tab is separated into two sections: Group Information and Member Information.
The Group Information fields are further defined:
Field |
Description |
|---|---|
Group |
Enter the group name. |
Type |
Select a type of group.
Committee: Defines a committee other than the governing board. Residents must be attached to the group in order to gain access to the events or reports defined for the group.
Governing: Defines the primary board group. There should only be one governing group per property. Residents must be attached to the group in order to gain access to the events or reports defined for the group. Governing members see all groups defined for the property.
Manager: If employees will have access to the properties report data from the administrator website, select this group type. Al linked employees to the property (see Property Setup/Employee) will have access to the property information.
Public: There should only be one public group, but this allows all residents access to the website. No resident accounts need to be added to this group, as all accounts will have access to the public events and reports defined for the group. |
Location |
Enter the group's central location (i.e.: library or clubhouse). |
Address/City/State/Zip |
Enter the group's city, state and zip code, if applicable. |
Note |
Enter any relevant notes. |
Folder |
Enter the folder address, if applicable. A name is added by default. This folder is the primary folder used to store web documents for the selected group. |
Report Group |
Select a report group from the list defined in Setup/Report Groups and Selection Parameters. This is the primary way to allow data access for the group owners. |
Members (resident accounts) must be attached to any committees or the governing group, in order for data access to occur on the website.
|
It is imperative that owners are removed from the committee or governing group when the term has expired |
The Member fields are further defined:
Field |
Description |
|---|---|
Member |
Select a member by using the Add File |
Title |
Enter the title for the selected member. |
Term |
Enter the ending term date. |
Leader |
Check this box if the selected member is a leader. Leaders have the ability to add and/or modify the event calendar. Governing leaders can approve A/P vouchers and add/or modify the online surveys. |
No Web |
Check this box if the selected member should not be displayed on the web. |
Send Information |
Check this box if the selected member is to receive financial information via mail. |
Note |
Enter any notes. |
Web Email |
Enter the e-mail address used on the web by selecting the Add Email |
How to Add a Group:
1.Click the Add ![]() icon or type the information into a empty section of the grid.
icon or type the information into a empty section of the grid.
2.Change the default name * New Group to the desired group name.
3.Select the correct group type.
4.Enter the location information.
5.Select a report group to allow access for the members of the group.
6.If a committee or governing group, select the members for the group.