Report groups are used to give access to users within the VMS modules, website committees, website residents, website employees and vendors. Users with access to a report group will be able to print any report attached to a report group. The areas to link report groups are Program Control/Information, Property Setup/Information, Program Defaults/Vendor and Resident and Property/Property/Groups.
|
When creating report groups for external users such as residents, governing boards, committees and vendors, it is important to only allow access to reports with data you want the users to see. The program is designed to limit the data automatically based on the user generating the report. For example, if you create a Resident Web group and add a Compliance Log report to the group, the residents printing this report will only see the information pertaining to their unit, not all of the units in the property. However, if the same report is added to the Compliance Committee and a member logs into the website to generate the report, the program will print a report for all of the residents within the community. |

This section of the screen is used to maintain the groups and reports within the system.
The fields are further defined:
Field |
Description |
Groups |
Select the group to maintain. |
Name |
Enter the name of the group. |
Report Name |
Enter the common name the user assigns to a report that is added to the group (definition name). The group can contain the same report multiple times, but the parameters added to each report can be different, as defined in the next section (Report Groups and Selection Parameters/Report Parameters). |
Definition Name |
This the actual report template name imported into the VMS program. |
To Add a Group:
| 1. | In the Group field, click on the arrow next to the Add |
| 2. | Select Add Group from the drop-down menu. |
| 3. | Change the name of the group to reflect what it is going to be used for in the VMS program. |
| 4. | Add other reports as needed. |
To Modify a Group:
| 1. | In the Group field, select a group to maintain from the drop-down control. |
| 2. | Change the name or reports. |
To Add Reports:
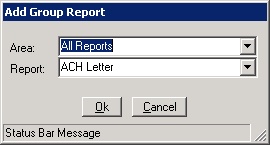
| 1. | Right-click in the Report Name field OR click on the down arrow next to the Add |
| 2. | Select Add Report. |

The Area drop-down menu allows the classification of various areas of the VMS program. When reports are imported into the system, the corresponding area is linked to the report.
The Report drop-down menu allows the user to select the report you want to add to the group.
Once a report is added to the group, the user can modify the Report Name to fit the use of the report.
|
If the necessary report is not located through any of the above steps, it may need to be imported from the VMS report database. |
Special Features
There are two special features designed to save users time when working with groups and reports:
Copy Group
If the cursor is located in a Groups or Name entry box, the user can select the down arrow next to the Copy Data ![]() button (or right-click on either label) to copy the entire group. This is helpful if the user needs a number of reports within a group, but wants to delete a few of them or make modifications to the parameters used to generate report information.
button (or right-click on either label) to copy the entire group. This is helpful if the user needs a number of reports within a group, but wants to delete a few of them or make modifications to the parameters used to generate report information.
Copy Report
If the cursor is in the Definition Name field of the grid, the user can click on the down arrow next to the Copy Data ![]() button (or right-click on either label) to copy a report to an existing group. This feature is helpful if a report is needed in another group, or if the user copies it to the same group but needs to modify the parameters to extract other information.
button (or right-click on either label) to copy a report to an existing group. This feature is helpful if a report is needed in another group, or if the user copies it to the same group but needs to modify the parameters to extract other information.