Report Groups and Selection Parameters: Parameters |
  
|
Report Groups and Selection Parameters: Parameters |
|
This section allows the user to add parameters to any report. The parameters are derived from the area the report is linked to and can be added from a list of fields or copied from other reports.
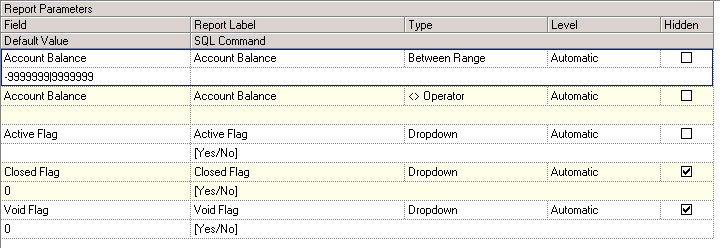
Report parameters are used to filter the information that will be rendered on each report. As mentioned, your may have the same report used several times in various or the same group of reports, but the parameters defined for each report define how the data is rendered. Every report in VMS can have unique parameters. Example: The Aging report is used as a prepaid and delinquency report, the only difference is the balance parameter used. The prepaid report has a balance parameter range of -999999.99 to 0, which only adds prepaid balances to the report, as the delinquency report would have the balance parameter defined as 0 to 9999999.99.
|
Use consistent date parameters (i.e.: posting and transaction dates) when generating reports. |
The fields are further defined:
Field |
Description |
Default Value |
The value automatically filled in when the parameters are displayed for the report. The user can enter a default parameter, enter a beginning and ending default parameter, or select a system default parameter. The beginning and ending parameter is entered by using the double vertical line ( | ) between the default values. For example: -9999999.99|9999999.99 |
Field |
Used for filtering, and can be modified to make the information more user-friendly within the Report Generator. |
Hidden |
Check to keep this parameter hidden from the user. This type of parameter works well when default values are entered that force the report to print in a specific way. |
Level |
Each report template is made up of a primary report and possibly various sub-reports. The sub reports are used to acquire information for the primary report, such as an owners name, balance of an account, etc. Parameters can be defined for specific sub reports to filter the data on the report, without affecting the primary or other sub reports.
The Automatic level option forces the Report Generator to search the report template for the given parameter field and filter the data accordingly. This is the recommended setting. |
Report Label |
Used to identify the parameters entered by the user when generating reports, which are printed at the top of each report to identify the parameters used to create the report. |
SQL Command |
This field is used to define the selectable information users may choose for parameters when printing reports (defined further later in this section). |
Type |
Choose from the following options:
Entry Box: Allows the user to enter the filter parameter to search for when generating reports.
Drop-down: Uses the SQL Command field to populate the list, which allows the user to select a filter parameter.
List: Uses the SQL Command field to populate the list, which allows the user to select single or multiple items from the list to filter the report information.
Between Range: Allows the user to enter a beginning and ending range parameter to filter. For example: beginning and ending resident balance.
> (Greater than): The filter parameter entered by the user will be checked against the data and if it is greater than the filter parameter it will be added to the report.
< (Less than): The filter parameter entered by the user will be checked against the data and if it is less than the filter parameter it will be added to the report.
<= (Less than or equal to): The filter parameter entered by the user will be checked against the data and if it is less than or equal to the filter parameter it will be added to the report.
>= (Greater than or equal to): The filter parameter entered by the user will be checked against the data and if it is greater than or equal to the filter parameter it will be added to the report.
<> (Does not equal): The filter parameter entered by the user will be checked against the data and if it does not equal to the filter parameter it will be added to the report.
No Data Check: Data will be added to the report if there is no data in the field. For example, if the user wants to look at all open architectural records in a community the architectural closed date is added as a parameter with this filter type and if selected by the user, the program will display only open records.
> Dropdown: This is a combination of the drop-down type and > (greater than) type.
< Dropdown: This is a combination of the drop-down type and < (less than) type. |
This field defines the data filled into drop-down menus and list parameter types.
List Value Ranges
The user can enter specific list values using the curly brackets { } with specified display data and values. For example, there are several contact types allowed in the VMS system: All, Billing, Contact, Mailing, Management Company or Tenant. The user can filter a resident report by specific contact type, add the Resident Contact Type field parameter, select the parameter type from the drop-down menu and enter the following data in the SQL Command field: {All, 0, Billing, 1, Contact, 3, Mailing, 2, Management Company, 4, Tenant, 5}. When the parameter is displayed in the Report Generator, the drop-down menu/list parameter will display All, Billing and Mailing, allowing the user to select the specific type of contact to print on the report. The 0, 1, 2 value is how the data is stored in the database and will be used to filter the selected contact type.
SQL Command
Advanced function
The VMS database is SQL-compliant and can be viewed using various database tools. Drop-down menu lists can be populated by a SQL command. Every field in the database is logically grouped into a parent table. For example, the resident contact type, name and address, are grouped into a table known as ResidentContact, which has a parent known as the Resident table. The Resident table has information like active and ownership percentage. For every resident record, the system allows virtually unlimited resident contact records. This is known as a parent/child relationship.
An SQL command uses the parent/child relationship to extract information from the database, but only retrieves the data required for the user's needs. The VMS system allows the user to enter an SQL command to populate the drop-down list parameters, using the data stored in the VMS database. For example, if the user wants to filter an architectural log by the status of the record (a definable field in the VMS system, see Program Defaults/Codes), the user may set a parameter of Open, Closed, Pending Review or Need More Information. The following SQL command extracts the architectural status user codes from the database and allows the Report Generator to populate the drop-down list parameter:
SELECT cc_Name, cc_Name FROM CommonCode WHERE cc_Filter1=4 ORDER BY cc_Name
SELECT, FROM, WHERE and ORDER BY are SQL commands.
CommonCode is the table in the database where the codes are stored
cc_Name (Common Code Name) is the field the data is entered into
cc_Filter1 is the key value that denoted the specific code being entered
The SQL command is selecting the cc_Name from the CommonCode table, filter the data (WHERE) cc_Filter = 4 (4 is the value defined for Architectural Status codes. See Program Defaults/Codes for more definitions), which is how the architectural status information is stored, sorting the data by cc_Name (alphabetical).
When this command is executed in the Report Generator, the program will look at the database and extract the architectural codes from it to populate the drop down / list parameter.
Adding a Parameter:
You can add a parameter by using the table field list or copying the parameter from another report.
To Add by Field List:
| 1. | Click in the parameter grid |
| 2. | Click the down arrow next to the Add |
| 3. | Click Add Report Parameter. |
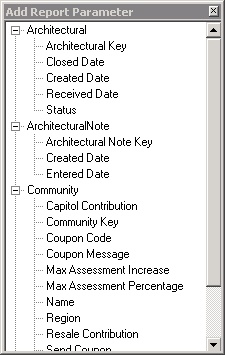
The pop-up list above contains the tables/fields through which the user can filter report parameters. Drag and drop the selected parameters to the parameter grid.
Repeat drag and drop until all desired fields are on the grid, then close the pop-up window.
Change the parameter based on the desired output for the report.
Copy a Parameter:
This procedure is the most efficient way to add a report parameter. The user has the ability to copy a parameter from a similar report without entering all of the data for the parameter.
To add by copy:
| 1. | Left-click in the parameter grid to access a speed menu. |
| 2. | Select Copy Report Parameter to bring up the following screen: |
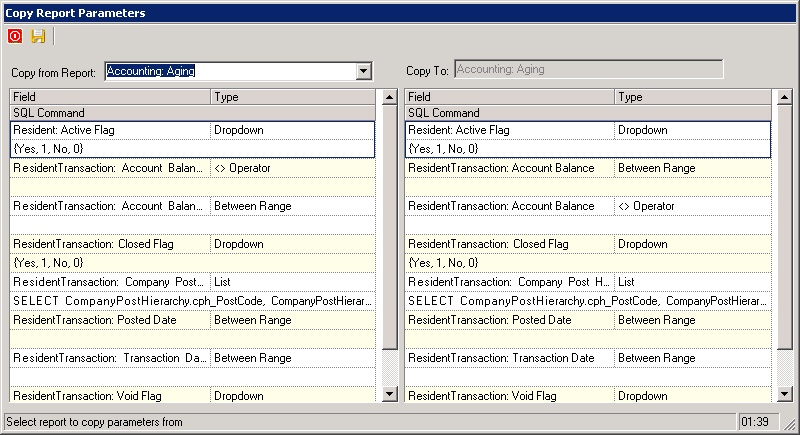
The Copy from Report drop-down menu contains a list of the reports attached to the same report area as the report to which the user is currently adding parameters. Select the desired parameter, drag and drop it from the Copy from Report parameter grid to the Copy To report parameter grid. Press the Save ![]() button to save the chosen parameters.
button to save the chosen parameters.