![]()
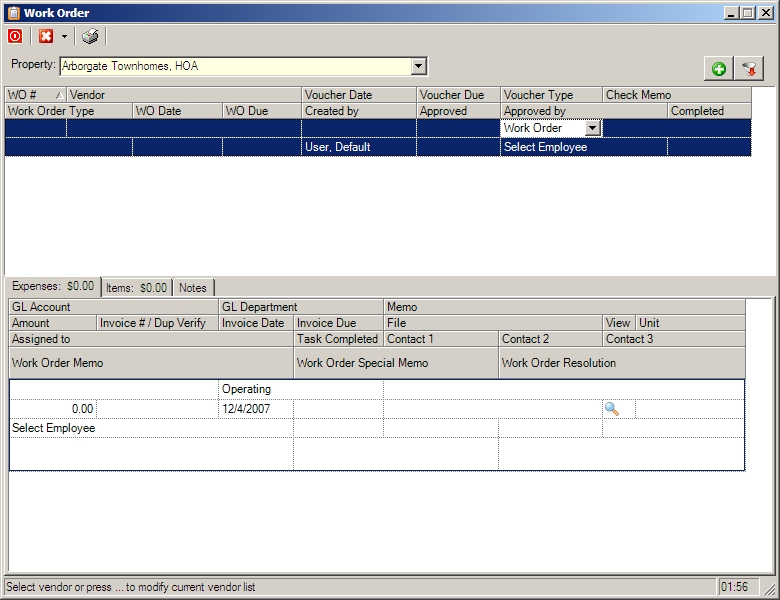
The Work Order module is a function of property management that allows users to enter work orders, which can generate work orders, invoices or estimates based on the information entered and the printed report.
Many of the fields and processes are similar to those in Entry/Accounts Payable.
There are several uses for the work order module. Basic work orders can be entered, printed and closed as needed, but work orders can be moved to A/P for payment, once the invoice information is entered into the system as valid expense and/or items. Typically managers are instructed to code received invoices prior to submitting to A/P for payment. The user can create a work order through this module, enter the invoice information and code the expenses, then change the type to Payment, which moves the information into the A/P module for payment.
The Voucher Type field defines the status of the work order. There are three types:
1.Work Order: Defines an open work order
2.Work Order Closed: Defines a closed work order
3.Payment: Moves the work order to A/P for payment.

The fields at the top of the screen are further defined:
Field |
Description |
|---|---|
WO # |
This is the work order number automatically generated once the work order is added to the system |
Vendor |
Select a vendor for payment. Select the Add File |
Voucher Date |
A/P field: Select the date the voucher is being processed |
Voucher Due |
A/P field: Select the due date, which can be used for reporting purposes |
Voucher Type |
The following selections can be defined:
Work Order: Keeps the work order in an open (pending) status.
Work Order Closed: Closes the work order.
Payment: Moves the work order to the Accounts Payable module to be processed.
|
Check Memo |
A/P field: A memo can be entered to be added to the payment record when the check is printed |
Work Order Type |
A predefined set of work order types (see Program Defaults/Codes) |
WO Date |
Select the work order date |
WO Due |
Select the work order due date |
Created by |
Select the employee that created the work order |
Approved |
Select the approved date |
Approved by |
Select the employee that approved the work order |
Completed |
Select the completed date |
How to Add a Work Order
1.Click the Add ![]() icon or type the information into a empty section of the grid
icon or type the information into a empty section of the grid
2.Select the vendor, press tab or click off of the field to generate the work order number
3.Select any of the applicable fields
4.Enter any expenses and/or items for the work order