Once the Delinquency Control cycle is established in Property Setup, the user can process delinquencies which will print/export letters and charge late fees and/or interest. The cycle setup determines the accounts that will be pulled into the cycle for processing.
|
A couple of things to remember before processing delinquency control: 1. Make sure billing and all adjustments batches and lockboxes have been processed. 2. Make sure the property is in the Current Period that the late fees are being run for. For example, if late fees are being run for the month of March 2015, the Current Period must be 03/31/15. 3. Any payments/credits posted and applied to the AR are used to determine the account's delinquent amount, even if they are posted past the late date. |
The Delinquency Control process is accessed through APPLICATIONS | Account Maintenance Group | Delinquency.
How to process delinquencies:
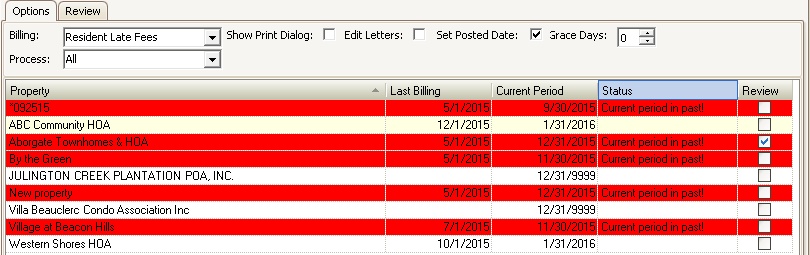
1. Select the Billing type that needs to be processed.
Field |
Description |
Resident Late Fees |
Only resident accounts will be processed. |
Developer Late Fees |
Only develop/builder accounts will be processed |
2. Select the delinquency cycle previously defined in SETUP | Property Group | Property Setup | Delinquency Control to Process.
Field |
Description |
All |
All cycles setup in Property Setup | Delinquency Control will be processed at the same time. |
Account Balance |
Only Cycles setup with the Account Balance Process option selected will be processed. |
Collection |
Only Cycles setup with the Collection Process option selected will be processed. |
Late Fee Balance Tier 1 |
Only Cycles setup with the Late Fee Balance Tier 1 option selected will be processed. |
Late Fee Balance Tier 2 |
Only Cycles setup with the Late Fee Balance Tier 2 option selected will be processed. |
3. Check the Show Print Dialog to show the dialog box prior to printing letters for each property.
|
This setting causes the workstation Print Dialog box to appear before each Property is printed in a batch, which can be used to enter a Copy Code if a system is in-place to manage charge backs when doing management fees. |
4. Check the Edit Letters box if the letters need to be edited prior to printing them.
|
This should only be selected if a rendered letter is created using a Merge Letter Editor template. |
5. Check the Set Posted Date box if the Posted Date needs to match the Transaction Date for all charges.
6. Enter the number of days to use as the Grace Period. This determines how far back to review any unprocessed late fees.
Example:
The current date is 3/31/16, but the late date is 3/15/16. The Grace Period should be 16 in order to process the past unprocessed period.
7. Check the Review box next to each property that needs to be processed
|
A property that is not in the correct Current Period will appear in Red. This alerts the user that Closing may need to be processed in order to put the property in the Current Period for which late fees are being charged. |
8. Go to the Review tab and click the Refresh button, ![]() , in the HOME tab or in the Quick Access Toolbar.
, in the HOME tab or in the Quick Access Toolbar.
9. The Alter All Accounts button will check the Skip box for each owner record in the list. Clicking the Alter All Accounts button again will uncheck the Skip box.
10. All owner accounts that meet the criteria defined in Setup | Property Setup | Delinquency Control will populate in the Review tab.
11. Click the plus sign next to each record to reveal the potential fees to be charged to the owner's account. The user should review the account information before processing late fees and letters. The user can manually change any of the following fields before processing:
Field |
Description |
No Web |
Check this box to deny the owner access to the web portal |
Liened |
Check this box to give the owner a lien status |
Certified # |
Enter the certified number for the owner's mailing |
Skip |
Skips the processing of the owner's account entirely when the box is checked for the record.
Only skips charging the owner any of the late fees when the box is checked next to the late fee posting codes |
Sequence |
Select the sequence the owner needs to be processed through |
eDistribution |
Select the eDistribution type:
Not Used: the letter is to only be printed Export/Print: tells the delinquency letter process to print / email (based on the defined Letter Distribution method) the letter and export to the eDistribution vendor Export Only: skips the internal print/email and only exports the letter to the eDistribution vendor
|
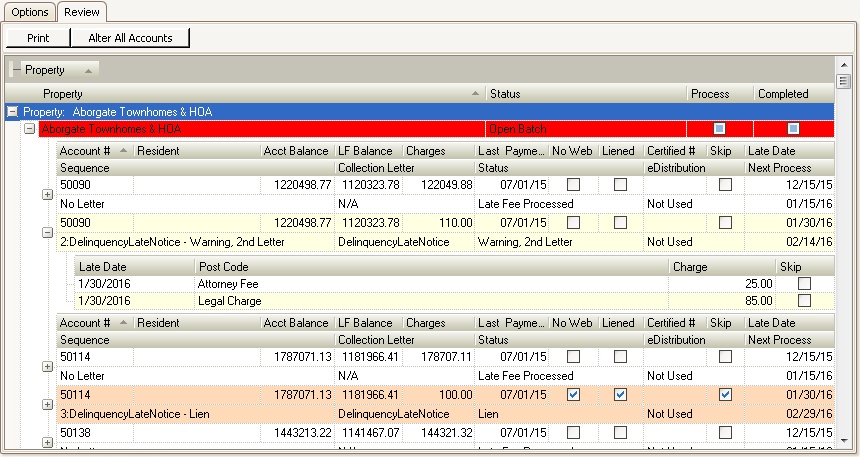
12. After any necessary changes have been made, click the Process checkbox next to the properties to process the selected properties and then click the Post button ![]() in the Quick Access Toolbar. The Completed box will be checked and a red line will be drawn through the property's name when posting is done.
in the Quick Access Toolbar. The Completed box will be checked and a red line will be drawn through the property's name when posting is done.
13. Late fees and delinquency letters will post to the accounts and push the letters to iXpert for bulk printing, if needed.
14. Go to the HOME tab and click on the iXpert button.
15. In the iXpert Options panel, click the Delinquency radial button. All delinquency processes that have been posted will appear as a batch in the iXpert Options panel.
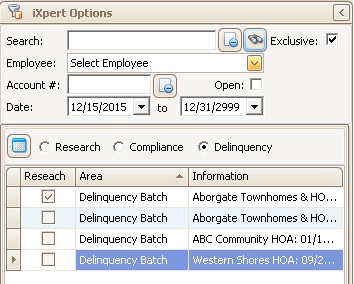
16. Check the Research box next to the batch(es) needed and then click the binoculars ![]() . In the panel to the right, the selected batches will appear in the iXpert Application.
. In the panel to the right, the selected batches will appear in the iXpert Application.
17. Check the Selection box next to each delinquency letter needed, or click the Select All button ![]() in the Quick Access Toolbar to select all letters for processing.
in the Quick Access Toolbar to select all letters for processing.
18. Click the Print button ![]() in the Quick Access Toolbar to print all batches to the default printer.
in the Quick Access Toolbar to print all batches to the default printer.
19. If all letters are successfully printed, press the Delete button ![]() in the Quick Access Toolbar to remove the letters from the batch.
in the Quick Access Toolbar to remove the letters from the batch.
|
Deleting the batches does not delete the actual letters attached to the delinquency process attached to the account. |