To use the Architectural application to the fullest extent, some setup is required.
Setting Up Architectural Codes
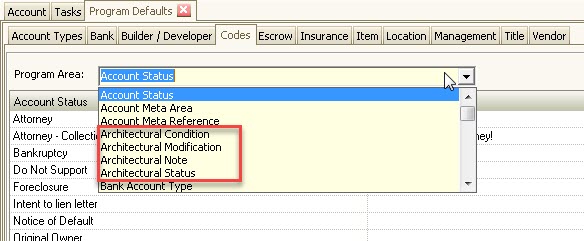
First, some Architectural Codes must be defined which will make entering an architectural request quick and easy. These codes correspond to fields in the Architectural record. There are 4 main code types that must be defined: Architectural Condition, Architectural Modification, Architectural Note, and Architectural Status.
These fields can be defined by going to SETUP | Program Defaults | Codes tab | Program Area <select one of the below>.

These fields are defined as follows:
Field |
Description |
|---|---|
Architectural Condition |
This is a condition that the architectural board/committee group is requesting from the residents/owners. Examples: Submit blueprints, Submit city permits, Submit material list, etc. |
Architectural Modification |
This is the modification that is being requested to be made by the residents/owners. Examples: Front yard, Door/Window replacement, Patio cover, Pool, etc. |
Architectural Note |
The user can enter additional notes regarding the architectural request and where they are in the process. Examples: Letter sent, File received, Sent to Architect, etc. |
Architectural Status |
This field will describe the final outcome of the request. Examples: Approved, Approved w/Conditions, Denied, Pending, Sent to Committee, etc. |
The next setup required is to create letters that can be generated within this application.
Setting Up Architectural Letters
The letters can be created using Merge Letter Editor which has a similar interface to Microsoft Word. The common types of letters are:
•Approved
•Approved with Condition
•Denial
Your management company may create other letters to fit your internal procedures. More information can be found in the Merge Letter Editor class.
Setting up an Architectural Web Group
Access can be given to members via Web Groups that will be responsible for reviewing Architectural requests online. These are usually the Board of Directors and the Architectural committee types.
1. To create an Architectural web group, go to APPLICATIONS | Property Management Group | Web Group.
2. Select the green Add button, ![]() , next to the Global Property dropdown menu to add a new group.
, next to the Global Property dropdown menu to add a new group.
3. In the Committee field, give your group a name. Mostly commonly used are Architectural and ARC.
4. In the Type field, select Architectural.
5. Select residents who will be part of the Architectural web group. They can be added in two ways:
oClick in the Member field and use the box with the three dots to search for them, or
oClick and drag them over from the Account List in the User Toolbar to the left.
6. Each member selected will then need a Term date entered. Once this date passes, the member will no long have access to see Architectural requests.

Giving Access to the Architectural Group
This Architectural Web Group must now be given access to the Architectural area in the web portal. This will allow this group to see any Architectural records in their property.
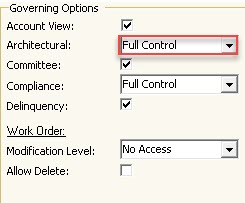
1. To give access to the group to see Architectural records, go to SETUP | Property Setup | Web tab | Access tab | Governing Options area | Architectural dropdown list.
2. Select one of the options available in the dropdown menu to give specific access to the Architectural Web Group. All members will have the same access.

The description of options available for this Architectural selection are as follows:
Option |
Description |
|---|---|
No Access |
This option does not allow the Architectural web group to see Architectural records. |
Add Notes |
This option allows the Architectural member to add notes to an Architectural record. |
Change ARCH / Add Notes |
This option allows the Architectural member to change the Architectural status on the record as well as add notes. |
Full Control |
This option allows the Architectural member full access to changing, updating and adding items to the Architectural record. |
Read Only |
This option allows the Architectural member the ability to only read the Architectural records. No changes can be made and not notes can be added. |
Creating Architectural Web Forms
Architectural web forms can be created in order to allow residents to fill out and submit an Architectural request online through the web portal.
1. To create an Architectural web form, go to SETUP | Web group | Web Form.
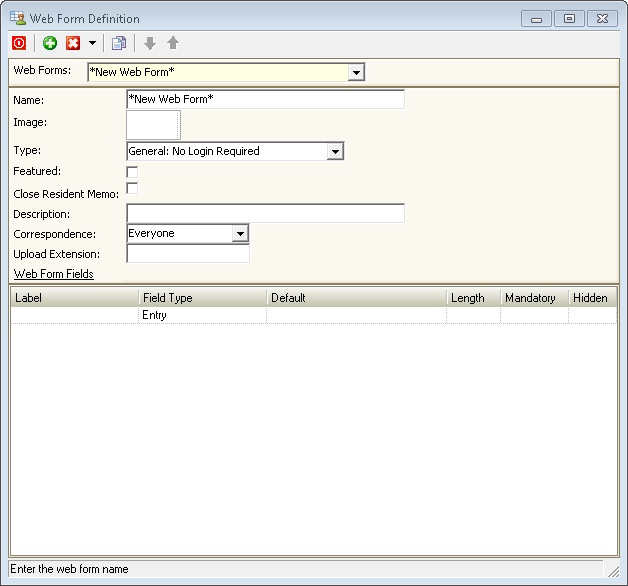
2. Click the green Add button, ![]() , to open a new Web Form Definition window.
, to open a new Web Form Definition window.

3. In the Name field, give your web form a name or title.
4. In the Image field, select an image that will be the thumbnail or icon for this web form. This is optional.
5. In the Type field, select Architectural. This is required.
6. The Featured box (optional) can be checked to feature this web form on the resident information tab on the web portal.
7. The Close Resident Memo box can be check to ????
8. In the Description field, write a description of what the web form is used for.
9. In the Correspondence field, select the employee defined with this definition who will receive the email correspondence for this web form.
10. In the Upload Extension field, the default document types are .jpg, .gif, .pdf, .doc. Others can be added as you need them.
11. The Web Form Fields can then be added to gather the information needed from the resident.
12. Close out of Web Form Definition window when finished. The new Architectural web form can now be found in the list of available Web Forms.