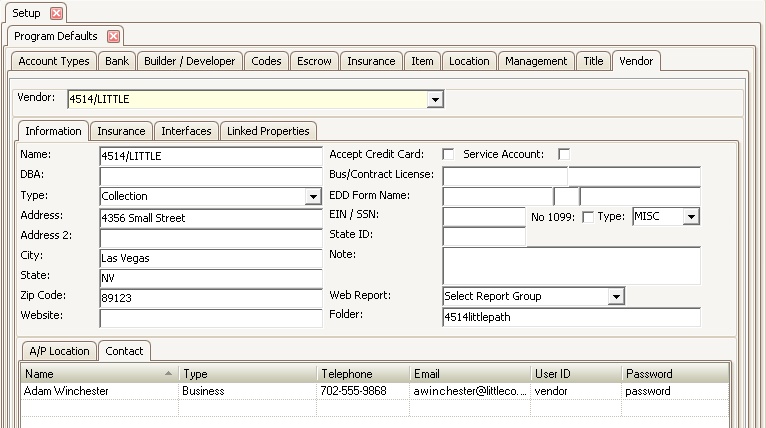
How to add a vendor:
1. In the Home tab, click the ![]() button.
button.
2. When a new record opens called *New Vendor*, enter the Vendor's:
a. Name of vendor.
b. DBA, if applicable. If filled in, it will print on 1099's.
c. Select the vendor Type (define custom vendor Types in Program Defaults | Codes tab | Vendor Type).
d. Address, Address 2 (if applicable), City, State, and Zip Code.
e. EIN/SSN.
f. Select No 1099, if the vendor does not need to receive a 1099.
g.In the Type field select MISC for the type of 1099 form the vendor needs to receive.
Other Vendor Information (for tracking purposes only):
Field |
Description |
|---|---|
Website |
URL of the vendors web site. |
Accept Credit Card |
Place a check mark if the vendor accepts credit card payments. |
Service Account |
Pace a check mark if the vendor manages title or resale documents. |
Business/Contract License |
Enter the vendor's business license number. |
EDD Form Name |
Field not used, originally added for CA EDD forms. |
State ID |
Enter the vendor's State ID. |
Note |
Field to enter any information about the vendor. This may be just like internal notes to your staff members. |
Web Report |
Used in VMSClientConnect when a vendor is granted access to login, the report group selected will be available of the vendor to print on-line. |
Folder |
Folder name automatically created by VMS, in order for the vendor to login. If Folder field is blank/empty, vendor will not be able to log in to VMSClientConnect. |
Vendor A/P Location
The AP Location tab allows the user to enter the remit address of the vendor that will be used in Accounts Payable module to be printed on checks.
To add A/P Location (two options):
1. Click in any field in the A/P Location tab. Then in the Home tab, click the ![]() button.
button.
This will copy all the information in the top half of the Information tab into the A/P Location tab in the lower half of the window. This contact information will be viewable in the Accounts Payable application.
2. Manually enter the vendor data in the corresponding fields. At minimum the following fields should be filled in: Location, Address, City, State and Zip Code.
|
Each vendor must have at least one location entered in the VMS system in order for them to be displayed in the AP maintenance module. Information located in this section will be used when printing AP checks for a vendor. |
|
If a vendor has different payment addresses (remit addresses), you may enter each one as a separate AP Location. |
Other Vendor Location Information (for tracking purposes only):
Field |
Description |
|---|---|
Telephone |
Vendor's location telephone. |
Fax |
Vendor's location fax. |
Vendor's location email. |
|
EIN / SSN |
Vendor's location Employer Identification Number (EIN) or Social Security Number. |
Inactive |
Place a check mark if this vendor location should no longer be used. By doing so, the vendor location will no longer be listed in Accounts Payable module. |
ACH Bank |
Unused field. Possibly used in future versions of VMS. |
Account # |
Unused field. Possibly used in future versions of VMS. |
Routing # |
Unused field. Possibly used in future versions of VMS. |
ACH Method |
Unused field. Possibly used in future versions of VMS. |
Vendor Contact
The Vendor Contact tab can be used for multiple purposes:
•To enter contact information of a person that works for the vendor. If an email address is entered for a Vendor Contact record, this email address can be used to email the vendor information about a Work Order.
•To allow access to a vendor to your VMSClientConnect website. For example, to allow an attorney or collection company to be able to render real-time owner statements:
▪Enter User ID and Password.
▪Give User ID and Password information to the attorney, including your VMSClientConnect web address.
•To allow a vendor to retrieve real-time data directly from your VMS database through VMSWebAPI services. For example a third party integration partner.
▪Enter User ID and Password.
▪Give User ID and Password information to the vendor, including your VMSWebAPI url (also know as VMSxChange url).
