Accounts Receivable: Recurring Maintenance |
  
|
Accounts Receivable: Recurring Maintenance |
|
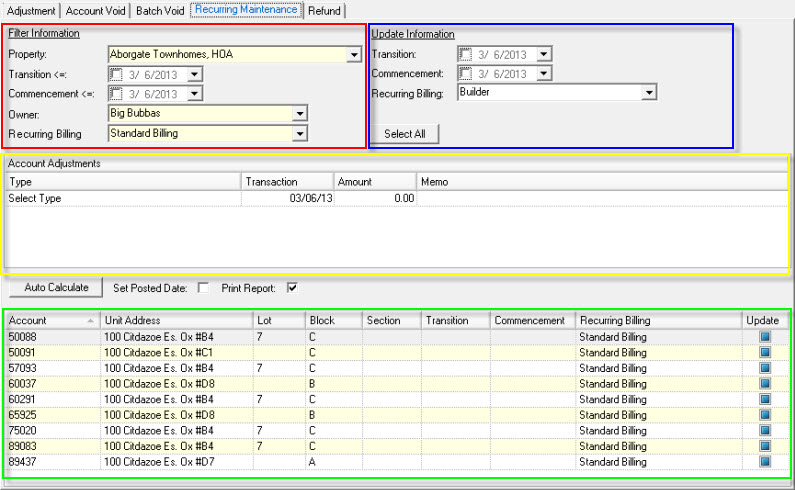
The Recurring Maintenance module allows you to change the Recurring Maintenance billing definition and post account adjustments to a filtered group of accounts in a single batch. The module allows a user to enter filter information (red box), then pressing the Refresh tool ![]() displays the accounts matching the filter criterion (green box). The user enters the changes required in the Information Update area (blue box) and has the ability to enter Account Adjustments information (yellow box) to each account selected for Update prior to pressing the post
displays the accounts matching the filter criterion (green box). The user enters the changes required in the Information Update area (blue box) and has the ability to enter Account Adjustments information (yellow box) to each account selected for Update prior to pressing the post ![]() button.
button.
|
If Account Adjustments are made, the system creates an adjustment batch for the property selected. In the unlikely event of a processing failure, the batch will remain and is accessible through the Adjustment module (see: Adjustment), which the user must manually post. |
The fields are further defined:
Field |
Description |
|---|---|
Property |
Select the property to manage. |
Transition |
The Transition date is an account specific field used to help transition an account from one Recurring Billing definition to another, normally associated to a builder owned units. |
Commencement |
The Commencement date is an account specific field used to help transition an account from one Recurring Billing definition to another, normally associated to a builder owned units. |
Owner |
The owner of the unit an account is attached to. |
Recurring Billing |
The Recurring Billing matrix attached to the account (see: Community Billing). |
Managing an adjustment:
1.Select a property, enter any filter parameters (red box) before pressing the Refresh tool ![]() to display a list of accounts (green box) that match the filter criterion.
to display a list of accounts (green box) that match the filter criterion.
2.Select the data fields to change for any selected accounts to post (blue box).
3.Select the account to update by checking the Update checkbox for each desired account to affect or selecting the Select All button.
There are two types of account adjustments you can make to each selected account, however, you must do adjustments in the following order:
Prorated Adjustments
If you want the system to create an adjustment for each selected account, based on the currently defined Recurring Billing for an account or the Community Billing definition (if Recurring Billing is not defined), press the Auto Calculate Button.
Two things happen when pressing Auto Calculate:
1.The module will clear ALL current adjustments made to the selected Update accounts
2.The module will look at each account and use the defined Recurring Billing entry or if it does not exist then use the Community billing definition to calculate the remaining days in the Annual, Monthly, Quarterly, Semi-annual period and create an adjustment record.
Manual Adjustments
For each account, you can enter adjustment records to post during the update process.
Select an account to adjust (red box), then within the Account Adjustment grid, click a blank row, select the Posting Code type (blue box), enter the transaction date to post, amount and any memo (green box).
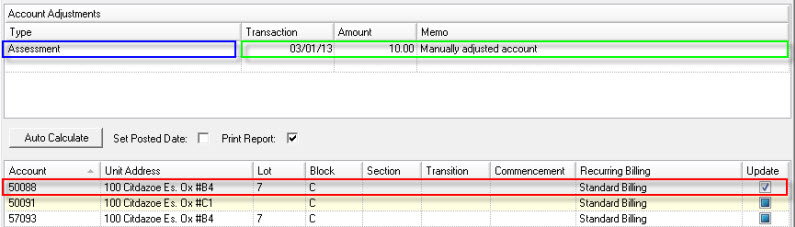
All adjustment area recreated per account, so you must select each account in order to post an adjustment record.
Pre-posting fields are further defined:
Field |
Description |
|---|---|
Set Posted Date |
Select this to force the posted date into the transaction date period (caution, you should only do this within a current period). |
Print Report |
Select this to print an adjustment batch when the system posts adjustments. |
Click the Post ![]() icon to adjust the selected accounts.
icon to adjust the selected accounts.