The Options tab allows the user to enter additional information related to the bank. The user can also setup the integration with the bank which allows the system to process tasks automatically through the Queue.
ACH
The ACH section in this tab is used in creating the NACHA files that are sent to the bank. The information entered here will allow the system to produce a NACHA file that has the correct bank information and the correct formatting.The fields below are used to customize data within the NACHA file and are decoded by the bank.

The fields are defined as follows:
Field |
Description |
|---|---|
Application ID |
Used in the NACHA header, position 10 for 8 characters (used in conjunction with the RID definition) |
Create Separate |
Used to create a separate file for each tax ID property |
Identifier |
Used to replace the tax ID in record 6 position 41 for 12 characters |
Immediate Destination |
Enter the Immediate Destination field used in record 1 position 5 for 10 characters |
Immediate Origin |
Place the bank's routing number here. There must be a '1' placed in the field in front of the number. |
Include ACH Padding |
Check this box if the bank requires the "999999 file padding". This option will add lines of 999999 to the ACH file that gets created. Some banks need the number of total lines in the file to be divisible by 10. These additional lines accomplish this task. |
Originating DFI |
Used in record 5 / 6 / 8 position 80 for 8 characters |
RID |
Used in the NACHA header, position 23 for 16 characters (used in conjunction with the Application ID definition) |
Tax ID |
Based on the bank, but typically a 1. Used in record 6 position 40 for 1 (VMS adds the troperty Tax ID after the this field), but if this entry is greater than 1 character, the entire entry will be used in position 40 for 13 characters, bypassing the property tax ID |
Unbalanced ACH |
Check this box if the bank uses unbalanced ACH files. An unbalanced file is created when a bank allows its customers to create ACH files that do not have an offsetting entry that automatically credits/debits the customer's offset account for the debit and/or credit transactions on the file. |
This section is one of the areas that allows the user to setup integration with participating banks. Please refer to your bank's setup procedures to know which tasks to add.
Different Queue events can be setup to process bank tasks automatically. These Queue events can also be viewed in SETUP | Configuration Group | Queue Management.
The user must contact the bank and be approved for integrating with their systems via VMS. Once the user has received all important usernames and passwords, they can go to SETUP | Configuration Group | Program Defaults | Bank | Options and setup certain tasks to process through the VMS Queue.
The fields are defined as follows:
Field |
Description |
|---|---|
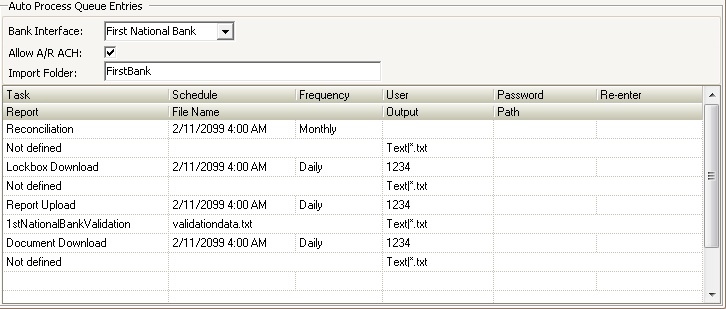
Bank Interface |
Select the name of the bank that you are integrating with. This tells VMS how to interact with the bank. |
Allow AR ACH |
Check this box if you want the system to automatically schedule the ACH Upload task through the VMS Queue. If this box is left unchecked, the user will have to create the ACH file and then manually upload it to the bank per the bank's instructions. |
Import Folder |
This is the name of the folder on the server. |
Task |
The bank tasks that can be scheduled are:
Reconciliation: This task will automatically pull information in from the bank related to cleared items on the bank statements. The system will retrieve transaction information and match it up with transactions in VMS. When the items match, the system will check off the transaction in APPLICATIONS | Banking: It will then be up to the user to double-check this information before posting. Lockbox Download: This task will automatically retrieve any lockbox files created by the bank that have not already been archived on their end.The file will be placed within the lockbox data folder and will be available for processing through APPLICATIONS | Account Maintenance | Lockbox. Report Upload: This task will automatically send a validation file to the bank on a regular basis. The validation file contains information such as: homeowner's names, VMS or prior account numbers, and address information. The bank must have this file on hand in order to process payments correctly. Document Download: This task will automatically retrieve bank statements and, in some cases, NSF reports.
|
How to add a Bank Queue Task:
1. Scroll down to the bottom of the Task list and place your cursor in the Task field.
2. A black down arrow will appear. Click on it and select a task.
3. Enter a Schedule time. This is the next date and time that this task will process.
4. Select the Frequency. This is how often you want the task to process. Options available are Daily, Hourly, Monthly, and Weekly.
5. Enter the User name provided by the bank.
6. Enter the password provided by the bank in the Password and Re-enter fields.
7. Select a Report name. This is only required for the Report Upload task.
8. Enter a File Name. This is a file name determined by the bank and only used for the Report Upload task.
9. The Output field remains as Text|*.txt
10. The Path remains blank unless otherwise instructed by the bank.
Helpful tips when entering Bank Queue Tasks:
▪Schedule the Lockbox Download and Document Download to run daily after the bank has loaded the files which is usually after 5am PST.
▪Schedule the Report Upload to run weekly, at a minimum. It can even be scheduled to run Daily. Homeowner information changes fairly often so it's important to make sure the bank has the most current information.
▪Schedule the Reconciliation to run Monthly on the 1st of the month.
▪Copy and paste the User name and Password assigned by the bank that were sent to you by email.