Accounts Payable: Items |
  
|
Accounts Payable: Items |
|
Items are defined for each property or can be added directly through this module by pressing the Add File ![]() button in the Item cell. The program allows the user to create a master set of items that can be attached to properties, which then allows the user to specify the G/L account code for the expense (see Setup/Program Defaults/Items and Property Setup/Accounting/AP/Items). The items can reflect electric bills, water bills or inventory-based items, which can then be selected for vouchers using this tab. When an item is selected, the user will only need to enter the amount of the expense and the program will use the defined G/L account code to post accordingly.
button in the Item cell. The program allows the user to create a master set of items that can be attached to properties, which then allows the user to specify the G/L account code for the expense (see Setup/Program Defaults/Items and Property Setup/Accounting/AP/Items). The items can reflect electric bills, water bills or inventory-based items, which can then be selected for vouchers using this tab. When an item is selected, the user will only need to enter the amount of the expense and the program will use the defined G/L account code to post accordingly.
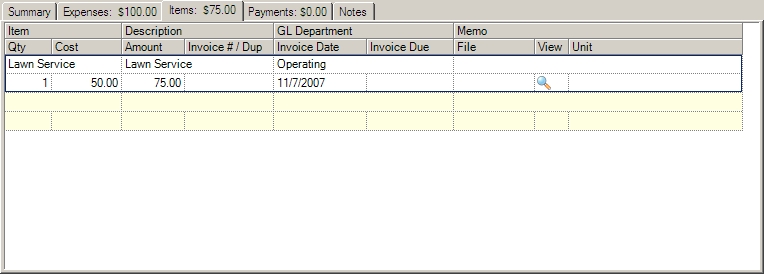
The fields are furthered defined:
Field |
Description |
Item |
Select an item (see Property Setup/Accounting/AP/Items). |
Description |
Displays the pre-filled description (see Setup/Program Defaults/Items). |
GL Department |
The G/L department to post the expense amount into when processed. If multiple departments are defined for the property, the user can specify the department used for posting or select Distribute, which will take the amount entered and equally distribute the amount between all departments automatically when the approval checkbox is selected. |
Memo |
Optional: Enter any information that is tracked for this expense. |
Qty |
Enter the item quantity; if the cost is entered the program, this will calculate the amount as [cost x quantity]. |
Cost |
Enter the cost of the selected item, which is used to calculate the amount to pay based on the quantity entered. |
Amount |
Enter the amount to pay for the selected item. |
Invoice #/Dup Verify |
Optional: Enter the invoice number received from the vendor for payment. The program will compare this number against the invoice number entered on other vouchers created for the vendor as a precaution against creating a duplicate payment request. |
Invoice Date |
Optional: This is the date the A/P module uses to post to the G/L. If no date is entered, the program will use the current date. |
Invoice Due |
Optional: This is the date the invoice is due and can be used for reporting purposes. If no date is entered, the program will use the current date. |
File |
Optional: Select the cell and click the browse button to attach a scanned or digital document to the expense. |
View |
Click the view button to load the attached file for viewing. |
Unit |
Optional: Used to select the specific property unit for which the expense amount is posted. The program will change the G/L department expense based on the unit's defined community department if defined; otherwise, it will use the company department. |
To Add New Items to the Property:
The user can select a pre-defined item from the list by using the drop-down menu, but the user has the ability to add items directly through the A/P billing module by pressing the Add File ![]() button in the Item cell. The following screen is displayed:
button in the Item cell. The following screen is displayed:
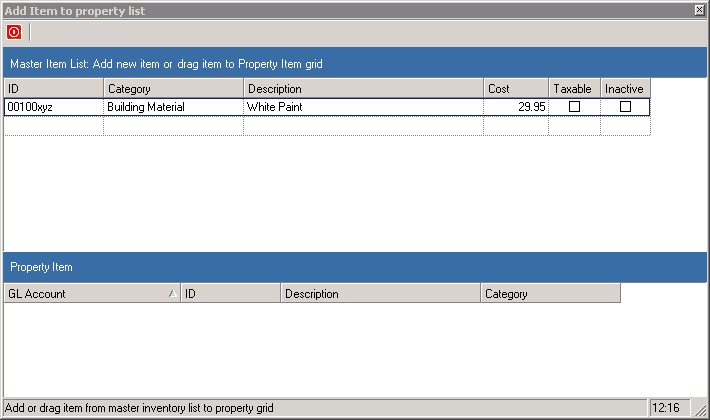
This screen is used to add items from the Master Item List to the Property Item list by dragging and dropping items from one grid to the other. In this example, the user can drag the item (00100xyz, above) to the property list, which adds it to the property list of items. Once the item is added to the property list, the G/L Account must be selected in order for the A/P module to recognize the item. The G/L Account is the expense account the A/P program will use to post journal entries when the voucher is approved (in accrual-based accounting) and when the check is printed.
The user can add a new item directly into the Master Item List by entering the new item in the first blank row in the inventory list, then dragging and dropping into the Property Item list (see First Steps/Program Defaults/Item).