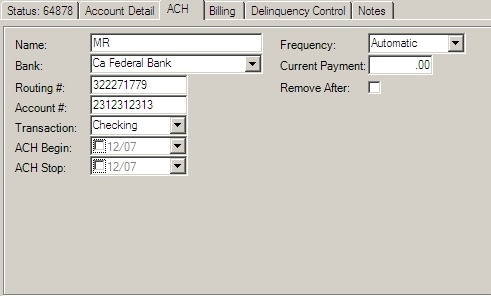
The ACH tab allows the user to add and maintain the resident's bank account information relating to their ACH payments. To enter a record, right click in the ACH tab area and select Add; if the record exists select Delete to remove the record.

|
Be sure not to add any blank or missing fields in this screen, as it will add an incomplete file line to the NACHA file that is processed by the U.S. Federal Reserve. |
The ACH options are further defined:
Field |
Description |
Name: |
Enter the resident's name as it appears on their check. |
Bank: |
Select from the drop-down list or enter manually the bank name (to define see: Setup/Program Defaults/Codes Bank Routing #). |
Routing # |
Either it was pre-filled by selecting the bank above or it must be manually entered. |
Account # |
Enter the account number for the ACH checking / savings account |
Transaction |
Choose if the resident's account is a checking or savings account. |
ACH Begin |
Select a ACH start date. |
ACH End |
Select an ACH end date. |
Frequency |
This field is used to define when the system removes the payment from the defined bank account.
Automatic: (Most commonly used) Instructs the billing routine to set this bank account for ACH payment extraction; the billing routine will determine the charge amount for the account.
Manual: Manual ACH records are not automatically processed by the ACH billing routine, but can be selected manually using the manual ACH routine in accounts receivable. |
Current Payment |
Enter the resident's current payment amount, which will be used the next time the ACH file is created, or leave 0.00. The billing module will automatically enter the amount to ACH based on the current billing charges for the account. |
Remove After |
Selecting this deletes the ACH data from the resident account once a file is processed. |
To Add an ACH Record to a Resident Account:
1. Right-click in the grey area to access the system's speed menu and select Add ACH.
2. The fields that were grayed out and inactive will now allow the user to enter data.
3. After entering all required fields, the user may then proceed to exporting the NACHA file (see: Entry/Accounts Receivable/ACH).