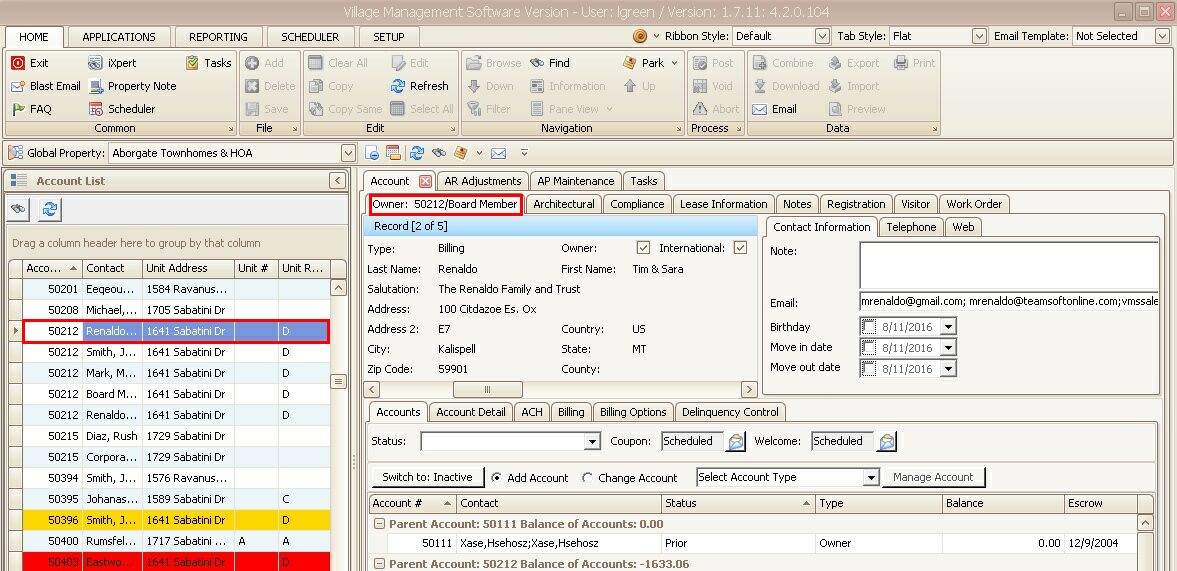
Account List is used to show all accounts derived from the Property List. The list of accounts are used in several of the Customer Relationship Module (CRM) applications, including Account, Adjustments, New Account, Compliance, Blast Email, and Web Group.
If a user wants to modify a specific account in the list, double-click the account in the grid to load the account in the Account tab.
If a user wants to add an account to an AR adjustment batch, with the batch loaded, drag and drop an account to the adjustment area.

The list grid has several additional operations:
▪Column Selection: This feature allows the user to customize the columns shown in the list. By right-clicking any of the columns, the user can select to Hide the current column from view or choose Column Chooser to select from over 40 fields to add to the column list.
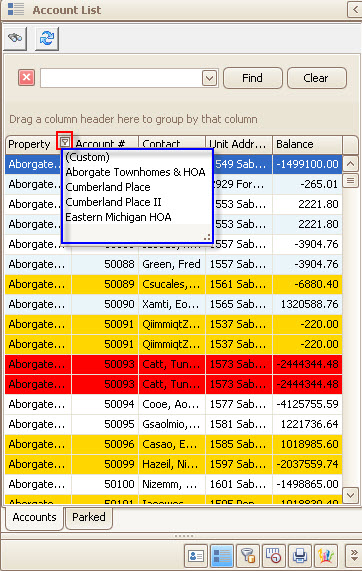
▪Column Filtering: When the mouse is hovered over a column, a small filter tool (red box) will appear allowing the user to filter the list be the unique items listed in this column (blue box). Example, if four properties are selected from the Property List, the user can filter the list to just show one of the properties. The filter can be removed by selecting the Filter again and selecting All or by selecting the close button displayed at the bottom of the grid ![]()
|
Any customizations of this panel are saved when closing VMS. |

▪Find Tool: The Find box can filter information within the grid using keyword combinations. If not shown, select any row in the grid and press Ctrl-F, which shows the Find box.
![]()
Within the find text box, enter a keyword to locate within the grid data or add additional keywords as discussed below:
a. Adding a + at the beginning of a word (excluding the first word) will tell the system to add the word to the search:.
Example: Search for the word bark and all records with bark, including barking will be returned. Adding +dog as a second search term will look for bark and dog
b. Adding a - at the beginning of a word (excluding the first word) will tell the system to exclude the word from the search:.
Example: Search for the word bark and all records with bark, including barking will be returned. Adding -dog as a second search term excludes dog from the search
|
The Find tool searches for information using the shown data within the visible columns of the grid. Example, you will not be able to locate an account by email address if you do not have the email address added as a column. |
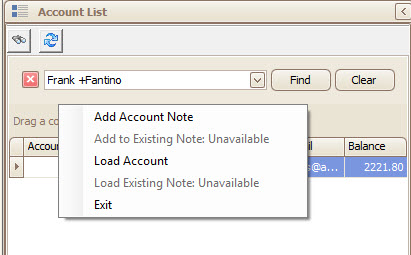
▪Drag and Drop Outlook email messages: Outlook email messages can be dragged / dropped to the Find Tool area, which will search the list for the email of the sender or name if no email is found. The email or name can only be located in the grid if the Email and Contact columns are added to the grid. Once a record is located, the system will display a list of operations that be used to manage the email.
•Add Account Note: Loads the Account then adds the Outlook message as an Account Note, which translates the email body into the note and adds the email as a Digital Attachment. The new note record has a unique Resource ID that can be entered into the Subject Line of a replied to email in the form of Call# xxxxxx, which can then be used to identify the account and call note on subsequent email exchanges with the sender.
•Add to Existing Note: Used to manage email messages sent back from a sender when the initial email was added to an Account Note and the Call# xxxxxx was added to the Subject Line of the replied to email with the Resource ID number generated by the system.
•Load Account: Loads the located account in the grid.
•Load Existing Note: Loads the account and note associated to the Call# xxxxxx found in the subject line of the email.

▪Drag and Drop Digital Files: External digital files like Excel, Work, .wav (voice mail files) or any digital document can be dragged / dropped to an account listed, which opens the Account and adds a note with the attachment automatically added to the note.
▪Drag and Drop Existing Account Note: In the event an Account Note is added to the wrong account in the system, with the Account and Note shown on the wrong account, the user can left-click the note while on the Resource ID field and drag the note to another account in the Account List. This moves the note to the correct account without the need to delete and re-enter the note on the correct account. A user must have read/write/delete access to the Notes tab.
▪
|
The xxxxxx after Call# refers to the unique Resource ID for every account note added into VMS. Enter this number after Call# to have the system automatically locate the note when dragging an Outlook email to the account list panel.
|
